Difference between revisions of "Daily Super Adventure Box W1Z2"
(Placeholder creation) |
|||
| Line 1: | Line 1: | ||
==Start== | ==Start== | ||
| − | + | Head forward as you start, ignoring the bouncy mushrooms and baubles, until you reach a small pool fed by a waterfall. Dig between the rock and the waterfall for five baubles. | |
[[file:W1Z1 Chest 1.png|Chest 1|405px|class=img-fluid]] | [[file:W1Z1 Chest 1.png|Chest 1|405px|class=img-fluid]] | ||
| Line 10: | Line 10: | ||
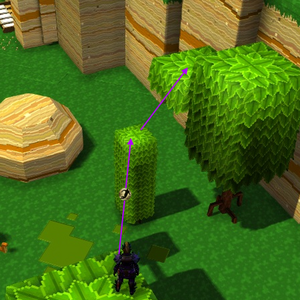
| − | Continue through the | + | Continue on into the dark woods. As you enter move to the left slightly (maintaining the direction you're facing) and you can line up a path through the trees as in the screenshot below. |
| + | |||
| + | [[file:W1Z1 Chest 1.png|Chest 1|405px|class=img-fluid]] | ||
| + | |||
| + | |||
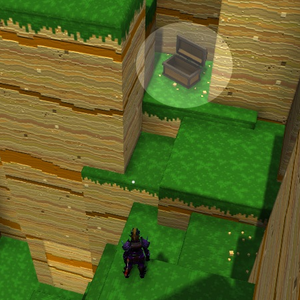
| + | Head along this path until you reach the wall, and dig in the corner just behind the leaves for a chest containing 20 baubles. Then follow the wall along to the right to reach the first checkpoint. | ||
==Checkpoint 1== | ==Checkpoint 1== | ||
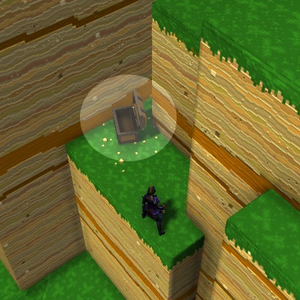
| − | + | Head through the next area, following the direction fingers and head up a hill to your right for a dig containing 10 baubles. | |
| + | |||
| + | [[file:W1Z1 Chest 1.png|Chest 1|405px|class=img-fluid]] | ||
| + | |||
| + | |||
| + | Then, head for the hollow tree stump and dig inside for another five baubles. | ||
| + | [[file:W1Z1 Bauble.png|Chest 1|405px|class=img-fluid]] | ||
| + | |||
| + | |||
| + | Continue on past the small pond and you should see the first shop in the left wall. Dig in front of the shop for 10 baubles. | ||
<div style="border:2px solid #292929;"> | <div style="border:2px solid #292929;"> | ||
| − | <div style="padding:0.5rem;text-align:left;background:#1d1d1d;color:#fff;border-bottom:1px solid #111111;border-top:1px solid #292929;">'''Optional: Interior Design | + | <div style="padding:0.5rem;text-align:left;background:#1d1d1d;color:#fff;border-bottom:1px solid #111111;border-top:1px solid #292929;">'''Optional: Interior Design 102'''</div><div style="background:#171717;padding:0.5rem;"> |
| − | + | Head inside the shop. | |
</div></div> | </div></div> | ||
| − | + | Past the shop is Checkpoint 2 | |
| − | |||
| + | ==Checkpoint 2== | ||
| + | Drop down into the water and head forward, following the trail of lily pads. At the far end of the water you will find a plant. Dig behind the leaf for 20 baubles. | ||
| − | + | [[file:W1Z1 Chest 2.png|Chest 2|405px|class=img-fluid]] | |
| − | |||
| − | + | Hop onto the lily pad, then quickly jump up on to the leaf you just dug behind, before the lily pad disappears. | |
| + | |||
| + | <div style="border:2px solid #292929;"> | ||
| + | <div style="padding:0.5rem;text-align:left;background:#1d1d1d;color:#fff;border-bottom:1px solid #111111;border-top:1px solid #292929;">'''Optional: Shortcut something something'''</div><div style="background:#171717;padding:0.5rem;"> | ||
| + | Immediately after reaching the bank, follow it along to the right until you are blocked by a large branch. You can jump to this large branch, then down the other side to find a small cave. Inside you will find the shortcut worm. Taking this worm is necessary for the daily, but will skip the rest of this level. | ||
| + | Bounce your way through the worm's insides, trying to pick up some baubles on the way while avoiding the pools of acid and floating bubbles. | ||
| − | + | If you dig where you exit the worm (look up for a lovely surprise) you will get five baubles. | |
[[file:W1Z1 Digs.png|Dig spots|405px|class=img-fluid]] | [[file:W1Z1 Digs.png|Dig spots|405px|class=img-fluid]] | ||
| + | |||
| + | You are now past the final checkpoint, and can skip to the appropriate [section]. If you still want the glitch, you can backtrack through the level to reach it, though the jumps are more challenging in reverse. | ||
| + | </div></div> | ||
| + | |||
| + | |||
| + | If not taking the shortcut, instead head into the tree to your left, and follow the normal route along to the next checkpoint. | ||
| + | |||
| + | |||
| + | ==Checkpoint 3== | ||
| + | |||
| + | <div style="border:2px solid #292929;"> | ||
| + | <div style="padding:0.5rem;text-align:left;background:#1d1d1d;color:#fff;border-bottom:1px solid #111111;border-top:1px solid #292929;">'''Optional: 95 baubles, Interior Design 102, Environmentally Friendly 102'''</div><div style="background:#171717;padding:0.5rem;"> | ||
| + | Once activated, you can backtrack through the level to pick up some extra baubles, a shop, and the ''Environmentally Friendly'' daily. If you knock down the mushroom just below the checkpoint, you can get back here faster, but it's much more efficient to /gg after the final dig to immediately return to the checkpoint. | ||
| + | |||
| + | |||
| + | Drop down, and {bomb} the wall to the left of the large rock. Head inside the opening for 25 baubles. | ||
| + | |||
| + | After exiting, face the shop and head along the right wall next to the large tree. Dig immediately after dropping down for another 20 baubles. | ||
| + | |||
| + | Continue following the wall until you pass through a tiny gap and up a hill. | ||
| + | |||
| + | Below you is the Queen Beedog and the honeycomb for ''Environmentally Friendly''. The time and danger in fighting her are not worth the baubles you get, so skip her unless you're doing the daily. Run past to the far end of the area and carefully jump around the tree to reach a higher platform. | ||
| + | |||
| + | Dig in the center of the platform for 50 baubles! /gg to return to the checkpoint (or walk all the way back). | ||
<gallery widths=300px heights=300px> | <gallery widths=300px heights=300px> | ||
| − | File:W1Z1 Dig 1.png| | + | File:W1Z1 Digs.png|Bomb Here. |
| − | File:W1Z1 DJ.png| | + | File:W1Z1 Dig 1.png|Dig after drop. |
| − | File:W1Z1 Dig 2.png| | + | File:W1Z1 DJ.png|Head through small gap. |
| + | File:W1Z1 Dig 2.png|Climb up tree. | ||
| + | File:W1Z1 Dig 2.png|Dig. | ||
</gallery> | </gallery> | ||
| + | </div></div> | ||
Revision as of 19:18, 3 January 2024
Start
Head forward as you start, ignoring the bouncy mushrooms and baubles, until you reach a small pool fed by a waterfall. Dig between the rock and the waterfall for five baubles.

Continue on into the dark woods. As you enter move to the left slightly (maintaining the direction you're facing) and you can line up a path through the trees as in the screenshot below.
Head along this path until you reach the wall, and dig in the corner just behind the leaves for a chest containing 20 baubles. Then follow the wall along to the right to reach the first checkpoint.
Checkpoint 1
Head through the next area, following the direction fingers and head up a hill to your right for a dig containing 10 baubles.
Then, head for the hollow tree stump and dig inside for another five baubles.

Continue on past the small pond and you should see the first shop in the left wall. Dig in front of the shop for 10 baubles.
Head inside the shop.
Past the shop is Checkpoint 2
Checkpoint 2
Drop down into the water and head forward, following the trail of lily pads. At the far end of the water you will find a plant. Dig behind the leaf for 20 baubles.

Hop onto the lily pad, then quickly jump up on to the leaf you just dug behind, before the lily pad disappears.
Immediately after reaching the bank, follow it along to the right until you are blocked by a large branch. You can jump to this large branch, then down the other side to find a small cave. Inside you will find the shortcut worm. Taking this worm is necessary for the daily, but will skip the rest of this level.
Bounce your way through the worm's insides, trying to pick up some baubles on the way while avoiding the pools of acid and floating bubbles.
If you dig where you exit the worm (look up for a lovely surprise) you will get five baubles.

You are now past the final checkpoint, and can skip to the appropriate [section]. If you still want the glitch, you can backtrack through the level to reach it, though the jumps are more challenging in reverse.
If not taking the shortcut, instead head into the tree to your left, and follow the normal route along to the next checkpoint.
Checkpoint 3
Once activated, you can backtrack through the level to pick up some extra baubles, a shop, and the Environmentally Friendly daily. If you knock down the mushroom just below the checkpoint, you can get back here faster, but it's much more efficient to /gg after the final dig to immediately return to the checkpoint.
Drop down, and {bomb} the wall to the left of the large rock. Head inside the opening for 25 baubles.
After exiting, face the shop and head along the right wall next to the large tree. Dig immediately after dropping down for another 20 baubles.
Continue following the wall until you pass through a tiny gap and up a hill.
Below you is the Queen Beedog and the honeycomb for Environmentally Friendly. The time and danger in fighting her are not worth the baubles you get, so skip her unless you're doing the daily. Run past to the far end of the area and carefully jump around the tree to reach a higher platform.
Dig in the center of the platform for 50 baubles! /gg to return to the checkpoint (or walk all the way back).

Bomb Here.
Dig after drop.
Head through small gap.
Climb up tree.
Dig.


If you are unable to make the jump, it is still worth returning for the dig. But this time you can jump from the higher tree section down to the left, which is much easier.
To the left of the next checkpoint is a section of loose rocks you can bomb, to open a room that contains 20 baubles. A shop can be found just to the left of this. You can now continue to the checkpoint.

Checkpoint 2 & Checkpoint 3
Traverse the ravine and activate the third checkpoint.
As you pass through the next area you'll see some beedogs collect baubles from flowers and fly away. If you follow them, they'll lead you through a gap in the wall and then through a maze.
To get through the maze without waiting for them: after coming through the gap, go to the end and turn right, follow the path until you find a green +5 bauble on your left. Collect it, turn right, and head forward again. Follow this path to the end. There are multiple optional objectives to complete here.


At the far end is the honeycomb you must destroy for Environmental Science. Destroy the barrel nearby to get a powerup that doubles your damage, making it easier to deal with the queen beedog.
Halfway between the entrance and the honeycomb is an Ooze garden. If it is the daily, you can dig one up, beat it until its stunned, then carry it to the end (it is recommended you have a decent amount of health as the Ooze will drain some).
Next to the entrance is a red glitch crystal. Hit it and quickly climb up the series of planks that appear to end up on top of the wall. Backtrack slightly along the wall to reach the glitch.
Now drop down to the left.
Head for the next checkpoint.
Checkpoint 4
After activating the checkpoint, jump forward and head to the hill on the right to find the Ooze Farmer. If you're not doing Ooze Transportation 101, you can destroy the barrel after the checkpoint for a speed boost and jump forward instead, collecting 3 baubles along the way. There's not much left to do now but climb the mountain in the middle to reach the boss.

If you still need Interior Design 101, just before the final checkpoint there is a mushroom you can attack to create a bouncepad below. Do so and drop down to find the last shop, then bounce back up and activate the checkpoint.

Comments
Enjoy an ad-free experience & support the website, for less than $1 per month! Upgrade to Premium