Difference between revisions of "Daily Super Adventure Box W1Z2"
(First draft) |
|||
| (8 intermediate revisions by one other user not shown) | |||
| Line 1: | Line 1: | ||
| − | + | {{#seo: | |
| − | + | |title=Daily Super Adventure Box W1Z2 Guide - GW2 - MetaBattle | |
| − | + | |description=Guide to finishing the daily W1Z2 SAB in Guild Wars 2. | |
| − | + | }}{{Guide | |
| + | | title = Daily Super Adventure Box W1Z2 | ||
| + | | description = Guide to finishing the daily W1Z2 in SAB | ||
| + | | mode = PvE | ||
| + | | section = Misc | ||
| + | | icon = W1Z1.webp | ||
| + | }} | ||
==Start== | ==Start== | ||
Head forward as you start, ignoring the bouncy mushrooms and baubles, until you reach a small pool fed by a waterfall. Dig between the rock and the waterfall for five baubles. | Head forward as you start, ignoring the bouncy mushrooms and baubles, until you reach a small pool fed by a waterfall. Dig between the rock and the waterfall for five baubles. | ||
| − | [[file: | + | [[file:W1Z2 Dig 1.png|Dig 1|405px|class=img-fluid]] |
| − | |||
| − | |||
| − | |||
| − | |||
| − | |||
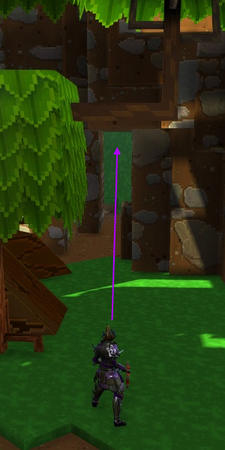
Continue on into the dark woods. As you enter move to the left slightly (maintaining the direction you're facing) and you can line up a path through the trees as in the screenshot below. | Continue on into the dark woods. As you enter move to the left slightly (maintaining the direction you're facing) and you can line up a path through the trees as in the screenshot below. | ||
| − | [[file: | + | [[file:W1Z2 Dark Woods.png|Path through Dark Woods|405px|class=img-fluid]] |
Head along this path until you reach the wall, and dig in the corner just behind the leaves for a chest containing 20 baubles. Then follow the wall along to the right to reach the first checkpoint. | Head along this path until you reach the wall, and dig in the corner just behind the leaves for a chest containing 20 baubles. Then follow the wall along to the right to reach the first checkpoint. | ||
| + | |||
| + | |||
| + | [[file:W1Z2 Dig 2.png|Dig 2|405px|class=img-fluid]] | ||
| Line 25: | Line 29: | ||
Head through the next area, following the direction fingers and head up a hill to your right for a dig containing 10 baubles. | Head through the next area, following the direction fingers and head up a hill to your right for a dig containing 10 baubles. | ||
| − | [[file: | + | [[file:W1Z2 Digs 1.png|Dig on hill and path to stump|405px|class=img-fluid]] |
Then, head for the hollow tree stump and dig inside for another five baubles. | Then, head for the hollow tree stump and dig inside for another five baubles. | ||
| − | [[file: | + | [[file:W1Z2 Dig 3.png|Dig 4|405px|class=img-fluid]] |
| + | |||
| + | |||
| + | <div style="border:2px solid #292929;"> | ||
| + | <div style="padding:0.5rem;text-align:left;background:#1d1d1d;color:#fff;border-bottom:1px solid #111111;border-top:1px solid #292929;">'''Optional: Locksmithing 102''' (40 baubles)</div><div style="background:#171717;padding:0.5rem;"> | ||
| + | From the previous dig, head up inside the hollow tree trunk that forms a kind of ramp, and hop around it to reach the large leaves on the other side. | ||
| + | |||
| + | Look around for the large, broken tree and make your way towards it, being careful of monkeys. | ||
| + | |||
| + | Carefully walk along the branch closest to the tree and jump inside. At the bottom is the first locked chest. | ||
| + | |||
| + | <gallery mode="packed" heights=300px style="text-align:left"> | ||
| + | File:W1Z2 Chest.png|Head along the leaves to the narrow branch. | ||
| + | File:W1Z2 Chest 1.png|Drop down and open chest. | ||
| + | </gallery> | ||
| + | </div></div> | ||
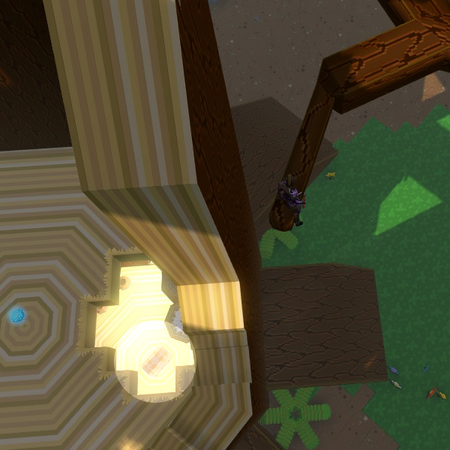
Continue on past the small pond and you should see the first shop in the left wall. Dig in front of the shop for 10 baubles. | Continue on past the small pond and you should see the first shop in the left wall. Dig in front of the shop for 10 baubles. | ||
| + | |||
| + | [[file:W1Z2 Dig 4.png|Chest 1|405px|class=img-fluid]] | ||
| + | |||
<div style="border:2px solid #292929;"> | <div style="border:2px solid #292929;"> | ||
| Line 47: | Line 69: | ||
Drop down into the water and head forward, following the trail of lily pads. At the far end of the water you will find a plant. Dig behind the leaf for 20 baubles. | Drop down into the water and head forward, following the trail of lily pads. At the far end of the water you will find a plant. Dig behind the leaf for 20 baubles. | ||
| − | [[file: | + | [[file:W1Z2 Dig 5.png|Dig 5|405px|class=img-fluid]] |
| Line 53: | Line 75: | ||
<div style="border:2px solid #292929;"> | <div style="border:2px solid #292929;"> | ||
| − | <div style="padding:0.5rem;text-align:left;background:#1d1d1d;color:#fff;border-bottom:1px solid #111111;border-top:1px solid #292929;">'''Optional: | + | <div style="padding:0.5rem;text-align:left;background:#1d1d1d;color:#fff;border-bottom:1px solid #111111;border-top:1px solid #292929;">'''Optional: Academic Probation'''</div><div style="background:#171717;padding:0.5rem;"> |
Immediately after reaching the bank, follow it along to the right until you are blocked by a large branch. You can jump to this large branch, then down the other side to find a small cave. Inside you will find the shortcut worm. Taking this worm is necessary for the daily, but will skip the rest of this level. | Immediately after reaching the bank, follow it along to the right until you are blocked by a large branch. You can jump to this large branch, then down the other side to find a small cave. Inside you will find the shortcut worm. Taking this worm is necessary for the daily, but will skip the rest of this level. | ||
| Line 60: | Line 82: | ||
If you dig where you exit the worm (look up for a lovely surprise) you will get five baubles. | If you dig where you exit the worm (look up for a lovely surprise) you will get five baubles. | ||
| − | + | <gallery mode="packed" heights=300px style="text-align:left"> | |
| + | file:W1Z2 Shortcut.png|Jump onto this branch, then to the other side. | ||
| + | file:W1Z2 Dig 10.png|Dig spot after exiting the worm. | ||
| + | </gallery> | ||
| − | You are now past the final checkpoint, and can skip to the appropriate [section]. If you still want the glitch, you can backtrack through the level to reach it, though the jumps are more challenging in reverse. | + | You are now past the final checkpoint, and can skip to the appropriate [[Guide:Daily_Super_Adventure_Box_W1Z2#Checkpoint_4|section]]. If you still want the glitch, you can backtrack through the level to reach it, though the jumps are more challenging in reverse.</div></div> |
| − | </div></div> | ||
If not taking the shortcut, instead head into the tree to your left, and follow the normal route along to the next checkpoint. | If not taking the shortcut, instead head into the tree to your left, and follow the normal route along to the next checkpoint. | ||
| + | |||
| + | <div style="border:2px solid #292929;"> | ||
| + | <div style="padding:0.5rem;text-align:left;background:#1d1d1d;color:#fff;border-bottom:1px solid #111111;border-top:1px solid #292929;">'''Optional: Locksmithing 102''' (40 baubles)</div><div style="background:#171717;padding:0.5rem;"> | ||
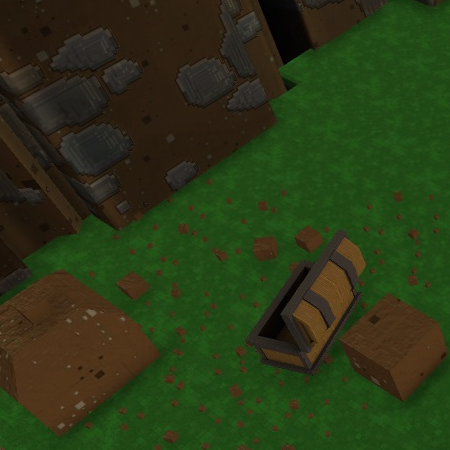
| + | While making your way to the next checkpoint, you can find the second chest wedged in a corner near the end. Unfortunately, there is no way to access this chest and reach the checkpoint without dropping down and completing another loop through the trees. | ||
| + | |||
| + | [[file:W1Z2 Chest 2.png|Chest 2|405px|class=img-fluid]] | ||
| + | </div></div> | ||
| + | |||
| Line 73: | Line 105: | ||
<div style="border:2px solid #292929;"> | <div style="border:2px solid #292929;"> | ||
| − | <div style="padding:0.5rem;text-align:left;background:#1d1d1d;color:#fff;border-bottom:1px solid #111111;border-top:1px solid #292929;">'''Optional: 95 baubles, Interior Design 102, Environmentally Friendly 102'''</div><div style="background:#171717;padding:0.5rem;"> | + | <div style="padding:0.5rem;text-align:left;background:#1d1d1d;color:#fff;border-bottom:1px solid #111111;border-top:1px solid #292929;">'''Optional: 95 baubles, Interior Design 102, Environmentally Friendly 102, Ooze Transportation 102'''</div><div style="background:#171717;padding:0.5rem;"> |
Once activated, you can backtrack through the level to pick up some extra baubles, a shop, and the ''Environmentally Friendly'' daily. If you knock down the mushroom just below the checkpoint, you can get back here faster, but it's much more efficient to /gg after the final dig to immediately return to the checkpoint. | Once activated, you can backtrack through the level to pick up some extra baubles, a shop, and the ''Environmentally Friendly'' daily. If you knock down the mushroom just below the checkpoint, you can get back here faster, but it's much more efficient to /gg after the final dig to immediately return to the checkpoint. | ||
| − | Drop down, and | + | Drop down, and [[File:MegaBomb.png|25px|link=https://wiki.guildwars2.com/wiki/Mega_Bomb|bomb]] [https://wiki.guildwars2.com/wiki/Mega_Bomb bomb] the wall to the left of the large rock. Head inside the opening for 25 baubles. |
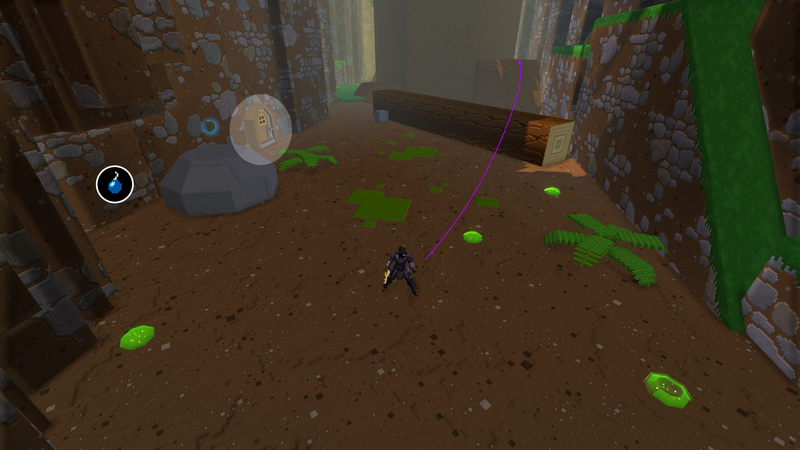
After exiting, face the shop and head along the right wall next to the large tree. Dig immediately after dropping down for another 20 baubles. | After exiting, face the shop and head along the right wall next to the large tree. Dig immediately after dropping down for another 20 baubles. | ||
| Line 87: | Line 119: | ||
Dig in the center of the platform for 50 baubles! /gg to return to the checkpoint (or walk all the way back). | Dig in the center of the platform for 50 baubles! /gg to return to the checkpoint (or walk all the way back). | ||
| − | <gallery | + | For ''Ooze Transportation'', it's best to wait until now to pick one up - they are just outside the shop, so drop down and take the bouncy mushroom back up. You will need to skip the glitch, as going through the teleporter will drop the ooze. |
| − | File: | + | |
| − | File: | + | <gallery mode="packed" heights=300px> |
| − | File: | + | File:W1Z2 Secrets.png|Bomb here and head inside the hole, then visit the shop if you want and head along the wall. |
| − | File: | + | File:W1Z2 Dig 6.png|Dig. |
| − | File: | + | File:W1Z2 Entrance.png|Head through small gap. |
| + | File:W1Z2 Honeycomb.png|Climb up tree. | ||
| + | File:W1Z2 Dig 7.png|Dig. | ||
</gallery> | </gallery> | ||
</div></div> | </div></div> | ||
| − | From the checkpoint, rather than drop down, instead hug the wall and head left past the bush and along the higher platforms to reach a dig spot that provides 20 baubles. If you dropped down accidentally, you can use the bouncy mushrooms to get back up. Now jump down and cross the poisoned water. | + | From the checkpoint, rather than drop down, instead hug the wall and head left past the bush and along the higher platforms to reach a dig spot that provides 20 baubles. If you dropped down accidentally, you can use the bouncy mushrooms to get back up. Now jump down and cross the poisoned water (If you still need ''Interior Design'', enter the shop here before crossing the water). |
| + | |||
| + | [[file:W1Z2 Dig 8.png|Dig 8|405px|class=img-fluid]] | ||
| + | |||
Immediately on the other side, there is another tree with two bouncy mushrooms. Use them to jump up into the canopy. | Immediately on the other side, there is another tree with two bouncy mushrooms. Use them to jump up into the canopy. | ||
| Line 105: | Line 142: | ||
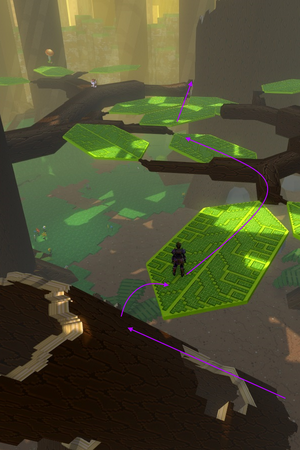
If you look towards the far wall, you can see a red glitch crystal. Activate it, then quickly jump across the platforms that appear to reach a teleporter. | If you look towards the far wall, you can see a red glitch crystal. Activate it, then quickly jump across the platforms that appear to reach a teleporter. | ||
| − | On the other side of the teleporter you will find the glitch. You can use a | + | [[file:W1Z2 Glitch.png|Glitch route|405px|class=img-fluid]] |
| + | |||
| + | On the other side of the teleporter you will find the glitch. You can use a {{tooltip|Boomerang}} to activate it, or carefully walk along the leaves and branches to reach it. Do a big jump back down to the poisoned water, and make your way back up the tree with bouncy mushrooms. | ||
</div></div> | </div></div> | ||
| Line 111: | Line 150: | ||
Make your way along the branches and leaves, being careful of monkeys until the checkpoint is in sight. | Make your way along the branches and leaves, being careful of monkeys until the checkpoint is in sight. | ||
| − | Just before the checkpoint is a large tree, where you will find the [Ooze Farmer]. Dig just behind him for 10 baubles. | + | Just before the checkpoint is a large tree, where you will find the [https://wiki.guildwars2.com/wiki/Ooze_Farmer Ooze Farmer]. Dig just behind him for 10 baubles. If you want to do ''Ooze Transportation'' and the glitch, it is easiest to /gg before you activate checkpoint 4 rather than backtrack. |
| − | [[file: | + | [[file:W1Z2 Dig 9.png|Dig 9|405px|class=img-fluid]] |
| Line 122: | Line 161: | ||
Activate the checkpoint, and use the bounce to land on a platform above the checkpoint (with a bouncy mushroom on it). Bounce on it to reach a higher platform, and dig twice here for a total of 20 baubles. | Activate the checkpoint, and use the bounce to land on a platform above the checkpoint (with a bouncy mushroom on it). Bounce on it to reach a higher platform, and dig twice here for a total of 20 baubles. | ||
| − | [[file: | + | [[file:W1Z2 Digs 2.png|Shortcut dig|405px|class=img-fluid]] |
With a long jump, you can ''just'' reach the horizontal log from the closest corner to it. Even if you don't quite make it, climb up to the top of the log and then round the wall to the bouncy mushroom that brings you to the boss. There is another bouncy mushroom you can knock down here to make returning to the boss easier should you die. | With a long jump, you can ''just'' reach the horizontal log from the closest corner to it. Even if you don't quite make it, climb up to the top of the log and then round the wall to the bouncy mushroom that brings you to the boss. There is another bouncy mushroom you can knock down here to make returning to the boss easier should you die. | ||
| − | |||
| − | |||
| − | |||
| − | |||
| − | |||
| − | |||
| − | |||
| − | |||
| − | |||
| − | |||
| − | |||
| − | |||
| − | |||
| − | |||
| − | |||
| − | |||
| − | |||
| − | |||
| − | |||
| − | |||
| − | |||
| − | |||
| − | |||
| − | |||
| − | |||
| − | |||
| − | |||
| − | |||
| − | |||
| − | |||
| − | |||
| − | |||
| − | |||
| − | |||
| − | |||
| − | |||
| − | |||
Revision as of 20:27, 29 March 2024
Start
Head forward as you start, ignoring the bouncy mushrooms and baubles, until you reach a small pool fed by a waterfall. Dig between the rock and the waterfall for five baubles.

Continue on into the dark woods. As you enter move to the left slightly (maintaining the direction you're facing) and you can line up a path through the trees as in the screenshot below.

Head along this path until you reach the wall, and dig in the corner just behind the leaves for a chest containing 20 baubles. Then follow the wall along to the right to reach the first checkpoint.

Checkpoint 1
Head through the next area, following the direction fingers and head up a hill to your right for a dig containing 10 baubles.

Then, head for the hollow tree stump and dig inside for another five baubles.

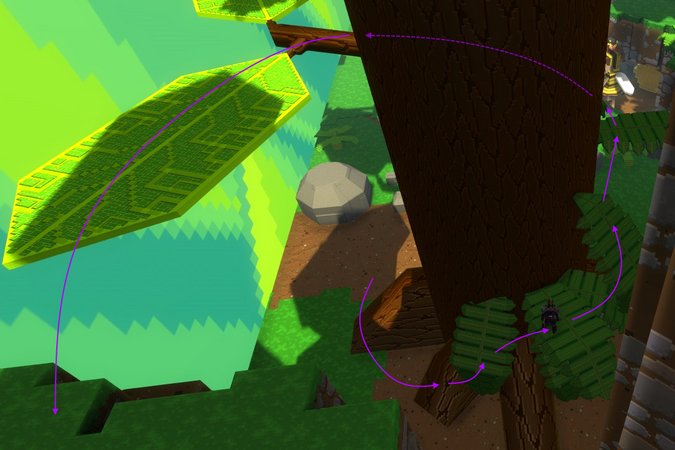
From the previous dig, head up inside the hollow tree trunk that forms a kind of ramp, and hop around it to reach the large leaves on the other side.
Look around for the large, broken tree and make your way towards it, being careful of monkeys.
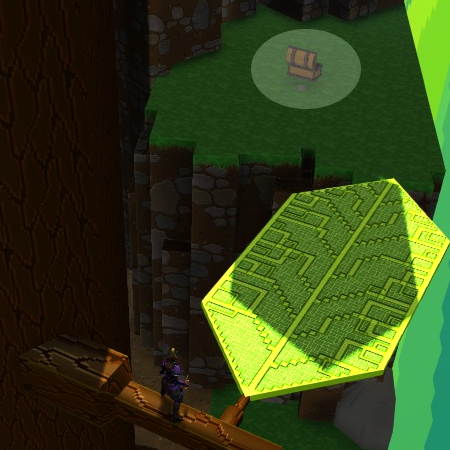
Carefully walk along the branch closest to the tree and jump inside. At the bottom is the first locked chest.
Head along the leaves to the narrow branch.
Drop down and open chest.


Continue on past the small pond and you should see the first shop in the left wall. Dig in front of the shop for 10 baubles.

Head inside the shop.
Past the shop is Checkpoint 2
Checkpoint 2
Drop down into the water and head forward, following the trail of lily pads. At the far end of the water you will find a plant. Dig behind the leaf for 20 baubles.

Hop onto the lily pad, then quickly jump up on to the leaf you just dug behind, before the lily pad disappears.
Immediately after reaching the bank, follow it along to the right until you are blocked by a large branch. You can jump to this large branch, then down the other side to find a small cave. Inside you will find the shortcut worm. Taking this worm is necessary for the daily, but will skip the rest of this level.
Bounce your way through the worm's insides, trying to pick up some baubles on the way while avoiding the pools of acid and floating bubbles.
If you dig where you exit the worm (look up for a lovely surprise) you will get five baubles.

Jump onto this branch, then to the other side.
Dig spot after exiting the worm.


If not taking the shortcut, instead head into the tree to your left, and follow the normal route along to the next checkpoint.
While making your way to the next checkpoint, you can find the second chest wedged in a corner near the end. Unfortunately, there is no way to access this chest and reach the checkpoint without dropping down and completing another loop through the trees.

Checkpoint 3
Once activated, you can backtrack through the level to pick up some extra baubles, a shop, and the Environmentally Friendly daily. If you knock down the mushroom just below the checkpoint, you can get back here faster, but it's much more efficient to /gg after the final dig to immediately return to the checkpoint.
Drop down, and ![]() bomb the wall to the left of the large rock. Head inside the opening for 25 baubles.
bomb the wall to the left of the large rock. Head inside the opening for 25 baubles.
After exiting, face the shop and head along the right wall next to the large tree. Dig immediately after dropping down for another 20 baubles.
Continue following the wall until you pass through a tiny gap and up a hill.
Below you is the Queen Beedog and the honeycomb for Environmentally Friendly. The time and danger in fighting her are not worth the baubles you get, so skip her unless you're doing the daily. Run past to the far end of the area and carefully jump around the tree to reach a higher platform.
Dig in the center of the platform for 50 baubles! /gg to return to the checkpoint (or walk all the way back).
For Ooze Transportation, it's best to wait until now to pick one up - they are just outside the shop, so drop down and take the bouncy mushroom back up. You will need to skip the glitch, as going through the teleporter will drop the ooze.
Bomb here and head inside the hole, then visit the shop if you want and head along the wall.

Dig.
Head through small gap.
Climb up tree.
Dig.


From the checkpoint, rather than drop down, instead hug the wall and head left past the bush and along the higher platforms to reach a dig spot that provides 20 baubles. If you dropped down accidentally, you can use the bouncy mushrooms to get back up. Now jump down and cross the poisoned water (If you still need Interior Design, enter the shop here before crossing the water).

Immediately on the other side, there is another tree with two bouncy mushrooms. Use them to jump up into the canopy.
If you look towards the far wall, you can see a red glitch crystal. Activate it, then quickly jump across the platforms that appear to reach a teleporter.

On the other side of the teleporter you will find the glitch. You can use a ![]() Boomerang to activate it, or carefully walk along the leaves and branches to reach it. Do a big jump back down to the poisoned water, and make your way back up the tree with bouncy mushrooms.
Boomerang to activate it, or carefully walk along the leaves and branches to reach it. Do a big jump back down to the poisoned water, and make your way back up the tree with bouncy mushrooms.
Make your way along the branches and leaves, being careful of monkeys until the checkpoint is in sight.
Just before the checkpoint is a large tree, where you will find the Ooze Farmer. Dig just behind him for 10 baubles. If you want to do Ooze Transportation and the glitch, it is easiest to /gg before you activate checkpoint 4 rather than backtrack.

Prepare yourself before you activate the final checkpoint, as there are 20 baubles that can only be reached with the one-time boost from activating it.
Checkpoint 4
Activate the checkpoint, and use the bounce to land on a platform above the checkpoint (with a bouncy mushroom on it). Bounce on it to reach a higher platform, and dig twice here for a total of 20 baubles.

With a long jump, you can just reach the horizontal log from the closest corner to it. Even if you don't quite make it, climb up to the top of the log and then round the wall to the bouncy mushroom that brings you to the boss. There is another bouncy mushroom you can knock down here to make returning to the boss easier should you die.
Comments
Enjoy an ad-free experience & support the website, for less than $1 per month! Upgrade to Premium