Difference between revisions of "Daily Super Adventure Box W2Z3"
| (4 intermediate revisions by the same user not shown) | |||
| Line 3: | Line 3: | ||
==Start== | ==Start== | ||
W2Z3 contains an enourmous number of baubles. This guide was written with a [https://wiki.guildwars2.com/wiki/Bauble_Tote_Bag 750-bauble limit] in mind, though a [https://wiki.guildwars2.com/wiki/Bauble_Backpack 1000-bauble bag] has been added since. The final chest and bonus level can provide ~135 baubles, so once you are this amount below your limit, you can ignore the extra baubles and just run to the end. | W2Z3 contains an enourmous number of baubles. This guide was written with a [https://wiki.guildwars2.com/wiki/Bauble_Tote_Bag 750-bauble limit] in mind, though a [https://wiki.guildwars2.com/wiki/Bauble_Backpack 1000-bauble bag] has been added since. The final chest and bonus level can provide ~135 baubles, so once you are this amount below your limit, you can ignore the extra baubles and just run to the end. | ||
| + | |||
| + | Players with an [https://wiki.guildwars2.com/wiki/Infinite_Continue_Coin Infinite Continue Coin] can /GG liberally during this run, resetting their {{tooltip|Moto's Finger}} each time. The [https://wiki.guildwars2.com/wiki/Polar_Bear_(Super_Adventure_Box) bears] throughout the level have a decent chance of dropping 10 baubles when killed, so it can be worth using this skill to instakill them. | ||
| Line 56: | Line 58: | ||
==Checkpoint 2== | ==Checkpoint 2== | ||
| − | If you drop down you collect a 10-bauble, then dodge the [https://wiki.guildwars2.com/wiki/Banana_(Super_Adventure_Box) bananas] and climb up the other side past another bear. Alternatively, you can jump around to the left of the checkpoint to not deal with the yellow pricks. | + | If you drop down you can collect a 10-bauble, then dodge the [https://wiki.guildwars2.com/wiki/Banana_(Super_Adventure_Box) bananas] and climb up the other side past another bear. Alternatively, you can jump around to the left of the checkpoint to not deal with the yellow pricks. |
On the other side, head left across an icy area with wind mouths and activate the checkpoint. | On the other side, head left across an icy area with wind mouths and activate the checkpoint. | ||
| + | |||
| + | |||
| + | |||
| + | ==Checkpoint 3== | ||
<div style="border:2px solid #292929;"> | <div style="border:2px solid #292929;"> | ||
| Line 79: | Line 85: | ||
| − | ==Checkpoint | + | ==Checkpoint 4== |
Head left past the checkpoint and climb along the wall being wary of the wind mouths and take the teleporter. On the other side are the [https://wiki.guildwars2.com/wiki/Ooze_(green) Oozes] required for ''Ooze Transportation 203'', if you hate yourself. Continue on round the corner and hop up the steps. | Head left past the checkpoint and climb along the wall being wary of the wind mouths and take the teleporter. On the other side are the [https://wiki.guildwars2.com/wiki/Ooze_(green) Oozes] required for ''Ooze Transportation 203'', if you hate yourself. Continue on round the corner and hop up the steps. | ||
| Line 101: | Line 107: | ||
Before taking the teleporter, use the {{tooltip|Glove of Wisdom}} to open the door back to the checkpoint. This is very important, as the next section contains two detours with a great number of baubles, and you'll need to reset to the checkpoint after each route. | Before taking the teleporter, use the {{tooltip|Glove of Wisdom}} to open the door back to the checkpoint. This is very important, as the next section contains two detours with a great number of baubles, and you'll need to reset to the checkpoint after each route. | ||
| − | After opening the shortcut, head through the teleporter. As a reminder, there are ~155 baubles available in the final part of this level which makes it very easy to hit the bauble limit if you have anything less than the 1000-bauble bag. As such, when you reach ~155 below your limit, you can just ignore the rest of the detours and just head for the end. | + | After opening the shortcut, head through the teleporter. As a reminder, there are ~155 baubles available in the final part of this level (even more if you backtrack for the ''Glitch'') which makes it very easy to hit the bauble limit if you have anything less than the 1000-bauble bag. As such, when you reach ~155 below your limit, you can just ignore the rest of the detours and just head for the end. |
<div style="border:2px solid #292929;"> | <div style="border:2px solid #292929;"> | ||
<div style="padding:0.5rem;text-align:left;background:#1d1d1d;color:#fff;border-bottom:1px solid #111111;border-top:1px solid #292929;">'''Optional: 160 baubles'''</div><div style="background:#171717;padding:0.5rem;"> | <div style="padding:0.5rem;text-align:left;background:#1d1d1d;color:#fff;border-bottom:1px solid #111111;border-top:1px solid #292929;">'''Optional: 160 baubles'''</div><div style="background:#171717;padding:0.5rem;"> | ||
| − | + | Turn around after emerging from the teleporter and jump up the rocks towards the spiked area. There is a 10-bauble sitting there to collect, but otherwise just continue on and drop down. Dig immediately for 20 baubles, then head on and to the left. | |
| + | |||
| + | If you stand on the corner of the next area, you can see a large pillar below you. Jump down to this pillar and dig for 50 baubles. Next, do a big jump all the way down to the icy area beneath you. | ||
| − | + | Toot your flute to open the wall (3-3-2-3-3-1), collect the 30 baubles inside, then head back out and follow the path around to the left to find another wall for your {{tooltip|Wooden Whistle}}. Open it up and collect the 50-bauble inside. /GG or jump off the cliff to reset to the checkpoint. | |
<gallery mode="packed" heights=300px style="text-align:left"> | <gallery mode="packed" heights=300px style="text-align:left"> | ||
| Line 117: | Line 125: | ||
| − | + | <div style="border:2px solid #292929;"> | |
| + | <div style="padding:0.5rem;text-align:left;background:#1d1d1d;color:#fff;border-bottom:1px solid #111111;border-top:1px solid #292929;">'''Optional: 50 baubles'''</div><div style="background:#171717;padding:0.5rem;"> | ||
| + | After returning through the teleporter, this time follow the pointing hands up to a higher level, but from this area head to the left of the pointing hands and drop down to a ledge (not all the way to the teleporter) and head inside. There are two routes you can go here, either jump left past the bear and drop down to the top of a pillar that you can dig for 20 baubles, or head right instead for a different dig that also provides 20 baubles. | ||
| − | + | From here, jump all the way down to the bottom level for a 10-bauble, then find the nearby teleporter and use it. This places you near a checkpoint, but you don't want to use it. Instead, carefully drop down past the ice bridge and dig for another 20 baubles. Either /GG or drop down to reset to the checkpoint. | |
| + | You could loop around another time to pick up the second dig, but it isn't really worth the time. | ||
| − | == | + | <gallery mode="packed" heights=300px style="text-align:left"> |
| − | + | file:W2Z2 Detour 3.png|Ignore the checkpoint and head around to the left of the building and then underneath. | |
| − | + | file:W2Z2 Dig 3.png|Dig underneath. You can /GG or drop into the void to reset, or carefully climb back up the wooden beams to reach the shop. | |
| + | file:W2Z2 Shop 1.png|Path to the shop when coming from the dig. | ||
| + | </gallery> | ||
| + | </div></div> | ||
| − | |||
| − | |||
| − | |||
| − | |||
| − | |||
| − | |||
| − | |||
| − | + | After emerging from the teleporter, follow the pointing hands up two levels and take the left teleport with the happy face. This takes you straight to checkpoint 10, before the Yeti fight. | |
| − | |||
| − | |||
| − | + | ==Checkpoint 10== | |
| + | At the top of the hill immediately in front of you is a Yeti - a miniboss you have to defeat to unlock the way forward. As you approach, it starts pounding the ground and launching snowballs down towards you. These snowballs travel along fixed lines, so climb up through the gaps and wait below the summit until the attack is finished. With {{tooltip|Moto's Finger}} and good dodges, you can kill him before he starts the snowball attack again. Upon death he drops a 20-bauble and spawns the teleporter. If you want to access the glitch and even more baubles, see the detour below. | ||
<div style="border:2px solid #292929;"> | <div style="border:2px solid #292929;"> | ||
| − | <div class="row" style="padding:0.5rem;text-align:left;background:#1d1d1d;color:#fff;border-bottom:1px solid #111111;border-top:1px solid #292929;"><div class="col-md">'''Optional: | + | <div class="row" style="padding:0.5rem;text-align:left;background:#1d1d1d;color:#fff;border-bottom:1px solid #111111;border-top:1px solid #292929;"><div class="col-md">'''Optional: Glitch and 110 baubles'''</div><div class="col-md" style="text-align:right;">[[file:MegaBomb.png|Bomb required for maximum baubles|24px]] [[file:Wooden Whistle.png|Whistle required for maximum baubles|24px]] [[file:Gg.png|GG required for efficiency|24px]]</div></div><div style="background:#171717;padding:0.5rem;"> |
| − | + | Rather than take the teleporter, it is possible to backtrack through the level to access the Glitch. Unfortunately, the checkpoint gate is locked, so getting past it requires use of a wall jump (also known as a pixel jump). The checkpoint in question it on the right side of the arena, if you're facing into it from the previous checkpoint. | |
| − | + | To perform a wall jump, you need to face a wall and jump forward into it, then spam jump again as you hit the wall. Timed properly, this jumps off the wall, allowing you to access higher areas than otherwise possible. In this case, you use one to get onto the narrow ledge on the checkpoint itself, then another against the adjacent wall to get over the checkpoint. You can then activate it as normal. Fortunately, if you're careful then you can land back on the narrow ledge if you fail the second wall jump so you don't have to do two back-to-back. | |
| − | + | Run along the narrow ice bridge, being careful of the wind mouths. If you can still hold more baubles, there is an easy dig in the area directly ahead of you which provides 50. | |
| − | + | Another 60 baubles can be reached following a roundabout route that leads you up above this area, though the jumps are fairly tricky [add pictures]. | |
| − | + | Finally, the Glitch can be accessed by facing the wall near where you enter and using the song of opening on your {{tooltip|Wooden Whistle}}. Inside, take the right teleporter to reach a cave with some red crystals, activate the first and jump along the planks that appear. Before reaching the last one, throw a ranged attack at the next crystal to continue on until you reach a narrow ledge with the Glitch. You can now /GG or find a hole to fall into to reset to the checkpoint. | |
<gallery mode="packed" heights=300px style="text-align:left"> | <gallery mode="packed" heights=300px style="text-align:left"> | ||
| Line 160: | Line 166: | ||
file:W2Z2 Detour 4-4.png|Jump down to the leaves, then use the flower to reach the next area. | file:W2Z2 Detour 4-4.png|Jump down to the leaves, then use the flower to reach the next area. | ||
</gallery> | </gallery> | ||
| − | |||
| − | |||
| − | |||
| − | |||
| − | |||
| − | |||
| − | |||
| − | |||
| − | |||
<gallery mode="packed" heights=300px style="text-align:left"> | <gallery mode="packed" heights=300px style="text-align:left"> | ||
| Line 179: | Line 176: | ||
| − | + | When you're ready, take the teleporter to reach the area before the Storm Wizard. | |
| − | |||
| − | |||
| − | |||
| − | |||
| − | |||
| − | |||
| − | |||
| − | |||
| − | |||
| − | |||
| − | |||
| − | |||
| − | |||
| − | |||
| − | |||
| − | |||
| − | |||
| − | |||
| − | |||
| − | |||
| − | |||
| − | |||
| − | |||
| − | |||
| − | |||
| − | |||
| − | |||
| − | |||
| − | |||
| − | |||
| − | |||
| − | |||
| − | |||
| − | |||
| − | |||
| − | |||
| − | |||
| − | |||
| − | |||
| − | |||
| − | |||
| − | |||
| − | |||
| − | |||
| − | |||
| − | |||
| − | |||
| − | |||
| − | |||
| − | |||
| − | |||
| − | |||
| − | |||
| − | |||
| − | |||
| − | |||
| − | |||
| − | |||
| − | |||
| − | |||
| − | |||
| − | |||
| − | |||
| − | |||
| − | |||
| − | |||
| − | |||
| − | |||
| + | There is one final dig of 50 baubles you can reach, though the jump is tricky. An easier way might be to use the checkpoint boost to land on top of the wall next to it, then dodge jump across to the next wall. If you manage, you can easily drop down on the other side and dig. | ||
| − | |||
| − | |||
| − | |||
| − | + | ==Storm Wizard== | |
| + | If you want the baubles and missed the checkpoint boost, you can jump across around the wall [next to betty bauble??] and just about land on the other side. Failing will reset you, so you can try again but it might not be worth the time to get it right. | ||
| − | |||
| + | When ready, you can take the teleporter to reach the boss. After an introduction, he will teleport to the edge of the arena and charge up a projectile attack. Timed correctly, the {{tooltip|Glove of Wisdom}} will reflect these projectiles back on him and allow you to get some hits in before he teleports again. | ||
| − | + | Starting at [50%?] health, he may point at a player and then chase them around for a while, knocking them back if he hits. He can be stunned out of this with a {{tooltip|Whip}} attack, though he is hard to hit [and evades while charging?]. | |
| − | + | When reduced to 0 health, he will reveal his true form and leave the platform as it breaks apart and starts falling. Lightning sparks appear and chase the players. Run around and kill them, but make sure you shortly jump onto one of the outer sections, as the Storm Wizard will use a lightning attack that covers the entire centre section. | |
| − | + | After this attack, he will zoom down into the fog below you. After a short delay, he will reappear underneath one of the outer sections and eat it. This attack will target a section that a player is on, so you can either wait until you see him coming then jump away, or just jump between platforms in a circle so that he misses. | |
| + | Finally, the Storm Wizard collapses into the centre platform and can be attacked. It is possible to hit him with {{tooltip|Moto's Finger}}, but it is prone to missing - [wait until the hat faces you?]. | ||
| − | + | Assuming you don't kill him in one burn, this attack pattern will repeat until he is defeated and the level is complete! | |
Latest revision as of 00:52, 14 November 2024
PLACEHOLDER GUIDE
Start
W2Z3 contains an enourmous number of baubles. This guide was written with a 750-bauble limit in mind, though a 1000-bauble bag has been added since. The final chest and bonus level can provide ~135 baubles, so once you are this amount below your limit, you can ignore the extra baubles and just run to the end.
Players with an Infinite Continue Coin can /GG liberally during this run, resetting their ![]() Moto's Finger each time. The bears throughout the level have a decent chance of dropping 10 baubles when killed, so it can be worth using this skill to instakill them.
Moto's Finger each time. The bears throughout the level have a decent chance of dropping 10 baubles when killed, so it can be worth using this skill to instakill them.
Due to the sheer size of this level, it is recommended that you take the teleporter shortcut that skips a large section of it. This means a number of dailies are not fully covered in this guide:
- Locksmithing 203 cannot be completed, though the wiki has a complete guide for the level that covers it.
- Ooze Transportation 203 is also extremely challenging, often requiring the use of multiple potions to complete. So this daily will also not be covered.
- Finally, the Glitch is also location in the section that we skip. However, it is at the very end so it is possible to backtrack slightly after the skip in order to reach it. This method does require using wall jumps though, so it may not be accessible to some players.
Run as usual to the first checkpoint and activate it. En-route, you can pause at a specific spot on the hill and throw a ![]() Boomerang across to the 10-bauble on the cliff behind you to pick it up.
Boomerang across to the 10-bauble on the cliff behind you to pick it up.
Checkpoint 1
Immediately after the checkpoint you can turn around and pick up some extra baubles as well as the Environmental Science 203 daily. You can return to this area again shortly, so if you don't want the first dig of 50 baubles, you can skip this section until then.
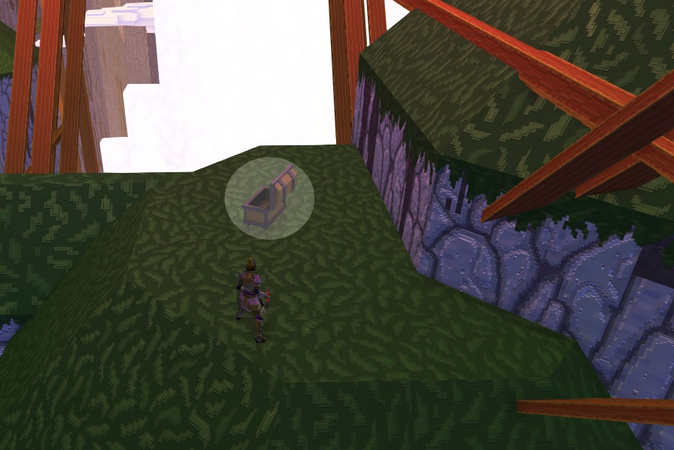
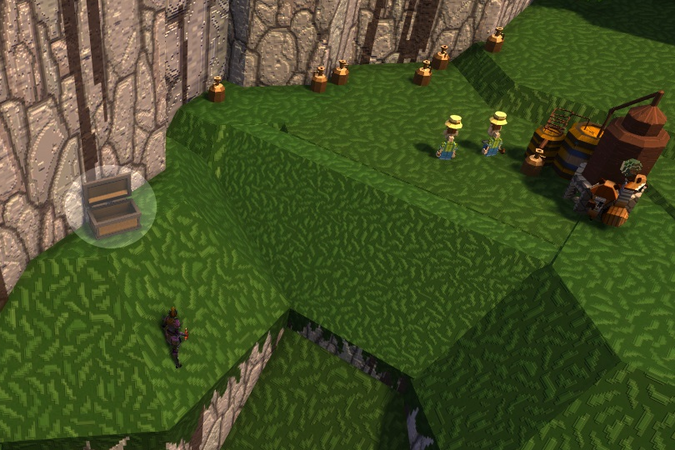
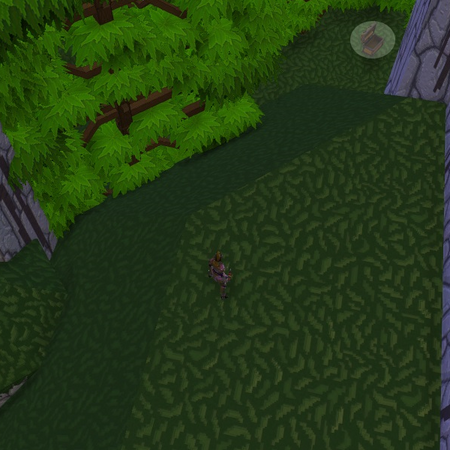
Head left from the checkpoint and drop down to pick up a 10-bauble, then continue down to the ground level. Go through the opening to your left and follow the path through the trees until you reach the pictured area near the cliff edge. With a run-up (a dodge jump helps but isn't necessary), you can jump to the narrow ledge, and then twice more to reach a snowy section. Dig here for 50 baubles. You can also see the Tree Stump nearby, though you can't reach it directly from here.
To get the other baubles and/or daily, jump back across the gaps and continue on through the trees. As mentioned, you can return here later, so if you fall then you can just carry on.
If you're doing the daily, it's recommended to do it first (if the Raccoon Kingpin murders you, you can just carry on and return later). The ice adds additional difficulty to avoiding attacks, so it may be easier to utilise a ranged weapon to avoid getting too close.
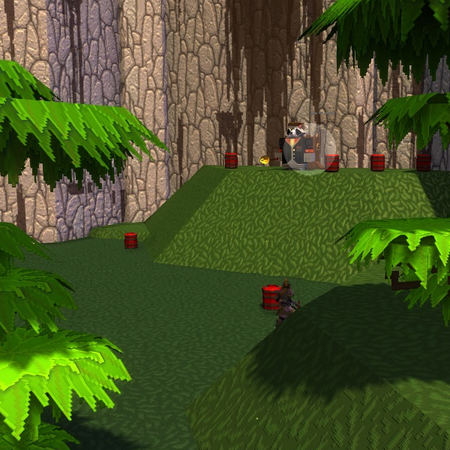
Next, backtrack to the pictured location and use your 24px Wooden Whistle to open the wall (3-3-2-3-3-1). Be careful of the owl in the nearby tree, as if it hits you it will interrupt your tune. Hop inside and climb all the way up, then drop all the way back down on the other side. Head [left/right?] into the corner and dig for 50 baubles. You can now /GG or return to the checkpoint, or if you want to save continue coins you can travel in the other direction to reach a hole to drop into.
Head forward from the checkpoint and round the corner to the left, being careful of the bear.
Round the corner is a shop you can enter for the daily.
Immediately to the right of the shop is a frozen waterfall. You can shatter this with your 24px Wooden Whistle, melt it with your torch, or hop around to the right. Whichever way you choose, the checkpoint is on the other side.
Checkpoint 2
If you drop down you can collect a 10-bauble, then dodge the bananas and climb up the other side past another bear. Alternatively, you can jump around to the left of the checkpoint to not deal with the yellow pricks.
On the other side, head left across an icy area with wind mouths and activate the checkpoint.
Checkpoint 3
This is the second chance to get Environmental Science 203 and the 50 baubles from earlier. Even if you already have those, there are some baubles that are easy to reach.
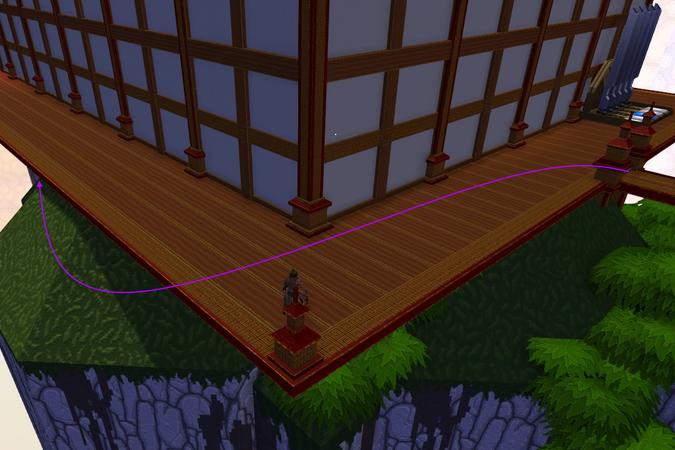
Backtrack from the checkpoint, and drop down to a platform, being careful not to get blown off by the mouths. There are two directions to go from here, take the left one first.
Drop down to collect 10 baubles, then use the ![]() Glove of Wisdom to open the wall and jump across to the small ledge. Dig here for 50 baubles and either /GG or fall down to reset to the checkpoint.
Glove of Wisdom to open the wall and jump across to the small ledge. Dig here for 50 baubles and either /GG or fall down to reset to the checkpoint.
Now return to the same place, and head right this time. Dig at the bottom for 50 baubles. You can now reach the area with the Tree Stump and 50 baubles from earlier by using the ![]() Glove of Wisdom on the wall.
Glove of Wisdom on the wall.
Checkpoint 4
Head left past the checkpoint and climb along the wall being wary of the wind mouths and take the teleporter. On the other side are the Oozes required for Ooze Transportation 203, if you hate yourself. Continue on round the corner and hop up the steps.
Before taking the teleporter, dig to the right for 20 baubles. Now take the teleporter. If attempting Ooze Transportation 203, you will instead need to climb all the way up the shaft, likely making heavy use of [health potions] to keep yourself alive.
At the top, push the block around to unlock the checkpoint and head through the teleporter. Once through, drop all the way down and open the wall with your ![]() Glove of Wisdom. Head right and drop down to another pushable block and take that teleporter too.
Glove of Wisdom. Head right and drop down to another pushable block and take that teleporter too.
On the other side, drop down to the snowy patch below you and dig for 20 baubles, then climb back up to the teleporter and jump up to the next teleporter while avoiding the goats.
Once through, you can dig to the left of the waterfall for 50 baubles (the dig spot is actually in the shop but you can trigger it through the wall). Go through the waterfall and push the block as normal to access the next teleporter. Once through, push the block and jump inside.
Before taking the teleporter, use the ![]() Glove of Wisdom to open the door back to the checkpoint. This is very important, as the next section contains two detours with a great number of baubles, and you'll need to reset to the checkpoint after each route.
Glove of Wisdom to open the door back to the checkpoint. This is very important, as the next section contains two detours with a great number of baubles, and you'll need to reset to the checkpoint after each route.
After opening the shortcut, head through the teleporter. As a reminder, there are ~155 baubles available in the final part of this level (even more if you backtrack for the Glitch) which makes it very easy to hit the bauble limit if you have anything less than the 1000-bauble bag. As such, when you reach ~155 below your limit, you can just ignore the rest of the detours and just head for the end.
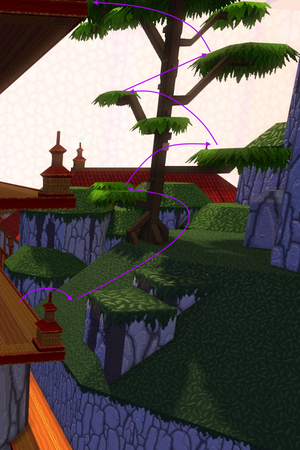
Turn around after emerging from the teleporter and jump up the rocks towards the spiked area. There is a 10-bauble sitting there to collect, but otherwise just continue on and drop down. Dig immediately for 20 baubles, then head on and to the left.
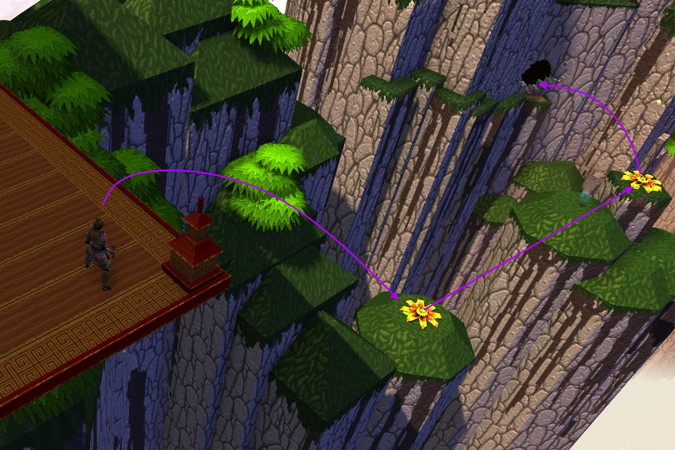
If you stand on the corner of the next area, you can see a large pillar below you. Jump down to this pillar and dig for 50 baubles. Next, do a big jump all the way down to the icy area beneath you.
Toot your flute to open the wall (3-3-2-3-3-1), collect the 30 baubles inside, then head back out and follow the path around to the left to find another wall for your 24px Wooden Whistle. Open it up and collect the 50-bauble inside. /GG or jump off the cliff to reset to the checkpoint.
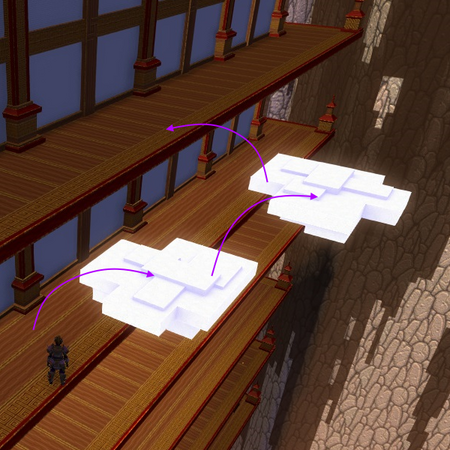
After returning through the teleporter, this time follow the pointing hands up to a higher level, but from this area head to the left of the pointing hands and drop down to a ledge (not all the way to the teleporter) and head inside. There are two routes you can go here, either jump left past the bear and drop down to the top of a pillar that you can dig for 20 baubles, or head right instead for a different dig that also provides 20 baubles.
From here, jump all the way down to the bottom level for a 10-bauble, then find the nearby teleporter and use it. This places you near a checkpoint, but you don't want to use it. Instead, carefully drop down past the ice bridge and dig for another 20 baubles. Either /GG or drop down to reset to the checkpoint.
You could loop around another time to pick up the second dig, but it isn't really worth the time.
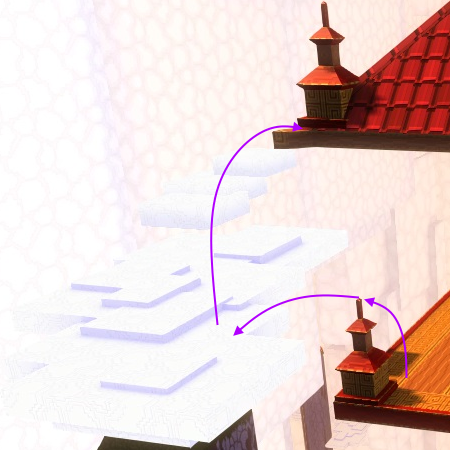
After emerging from the teleporter, follow the pointing hands up two levels and take the left teleport with the happy face. This takes you straight to checkpoint 10, before the Yeti fight.
Checkpoint 10
At the top of the hill immediately in front of you is a Yeti - a miniboss you have to defeat to unlock the way forward. As you approach, it starts pounding the ground and launching snowballs down towards you. These snowballs travel along fixed lines, so climb up through the gaps and wait below the summit until the attack is finished. With ![]() Moto's Finger and good dodges, you can kill him before he starts the snowball attack again. Upon death he drops a 20-bauble and spawns the teleporter. If you want to access the glitch and even more baubles, see the detour below.
Moto's Finger and good dodges, you can kill him before he starts the snowball attack again. Upon death he drops a 20-bauble and spawns the teleporter. If you want to access the glitch and even more baubles, see the detour below.
Rather than take the teleporter, it is possible to backtrack through the level to access the Glitch. Unfortunately, the checkpoint gate is locked, so getting past it requires use of a wall jump (also known as a pixel jump). The checkpoint in question it on the right side of the arena, if you're facing into it from the previous checkpoint.
To perform a wall jump, you need to face a wall and jump forward into it, then spam jump again as you hit the wall. Timed properly, this jumps off the wall, allowing you to access higher areas than otherwise possible. In this case, you use one to get onto the narrow ledge on the checkpoint itself, then another against the adjacent wall to get over the checkpoint. You can then activate it as normal. Fortunately, if you're careful then you can land back on the narrow ledge if you fail the second wall jump so you don't have to do two back-to-back.
Run along the narrow ice bridge, being careful of the wind mouths. If you can still hold more baubles, there is an easy dig in the area directly ahead of you which provides 50.
Another 60 baubles can be reached following a roundabout route that leads you up above this area, though the jumps are fairly tricky [add pictures].
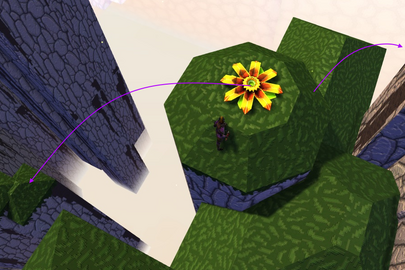
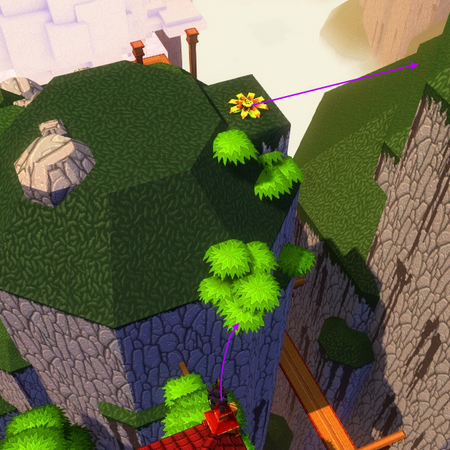
Finally, the Glitch can be accessed by facing the wall near where you enter and using the song of opening on your 24px Wooden Whistle. Inside, take the right teleporter to reach a cave with some red crystals, activate the first and jump along the planks that appear. Before reaching the last one, throw a ranged attack at the next crystal to continue on until you reach a narrow ledge with the Glitch. You can now /GG or find a hole to fall into to reset to the checkpoint.
- W2Z2 Bauble.png
Avoid the poisoned water and use the flute to open the wall.
When you're ready, take the teleporter to reach the area before the Storm Wizard.
There is one final dig of 50 baubles you can reach, though the jump is tricky. An easier way might be to use the checkpoint boost to land on top of the wall next to it, then dodge jump across to the next wall. If you manage, you can easily drop down on the other side and dig.
Storm Wizard
If you want the baubles and missed the checkpoint boost, you can jump across around the wall [next to betty bauble??] and just about land on the other side. Failing will reset you, so you can try again but it might not be worth the time to get it right.
When ready, you can take the teleporter to reach the boss. After an introduction, he will teleport to the edge of the arena and charge up a projectile attack. Timed correctly, the ![]() Glove of Wisdom will reflect these projectiles back on him and allow you to get some hits in before he teleports again.
Glove of Wisdom will reflect these projectiles back on him and allow you to get some hits in before he teleports again.
Starting at [50%?] health, he may point at a player and then chase them around for a while, knocking them back if he hits. He can be stunned out of this with a 24px Whip attack, though he is hard to hit [and evades while charging?].
When reduced to 0 health, he will reveal his true form and leave the platform as it breaks apart and starts falling. Lightning sparks appear and chase the players. Run around and kill them, but make sure you shortly jump onto one of the outer sections, as the Storm Wizard will use a lightning attack that covers the entire centre section.
After this attack, he will zoom down into the fog below you. After a short delay, he will reappear underneath one of the outer sections and eat it. This attack will target a section that a player is on, so you can either wait until you see him coming then jump away, or just jump between platforms in a circle so that he misses.
Finally, the Storm Wizard collapses into the centre platform and can be attacked. It is possible to hit him with ![]() Moto's Finger, but it is prone to missing - [wait until the hat faces you?].
Moto's Finger, but it is prone to missing - [wait until the hat faces you?].
Assuming you don't kill him in one burn, this attack pattern will repeat until he is defeated and the level is complete!
Comments
Enjoy an ad-free experience & support the website, for less than $1 per month! Upgrade to Premium
