Difference between revisions of "Daily Super Adventure Box W2Z2"
| Line 4: | Line 4: | ||
==Start== | ==Start== | ||
W2Z2 is probably the least rewarding zone for the time investment, and as such the run is pretty much a straight run to the shortcut eagle with only a few detours listed for extra baubles and dailies. | W2Z2 is probably the least rewarding zone for the time investment, and as such the run is pretty much a straight run to the shortcut eagle with only a few detours listed for extra baubles and dailies. | ||
| + | |||
| + | Due to the extreme amount of extra time that ''locksmithing 202'' would take, it is never recommended and this guide will not cover chests. The [https://wiki.guildwars2.com/wiki/Pain_Cliffs wiki] has a complete guide for the level that covers them. | ||
| Line 58: | Line 60: | ||
# Drop off sometime after the third set appears: Checkpoint 10. This is a very useful trick, as it allows you to reach the glitch, the tree stump and some extra digs while still leaving you close to the end. You can drop off as soon as you see the third set of owls, but if in doubt you can always delay a bit to entire you don't end up at checkpoint 6. | # Drop off sometime after the third set appears: Checkpoint 10. This is a very useful trick, as it allows you to reach the glitch, the tree stump and some extra digs while still leaving you close to the end. You can drop off as soon as you see the third set of owls, but if in doubt you can always delay a bit to entire you don't end up at checkpoint 6. | ||
# Ride all the way to the end: This positions you above the bell that opens the final checkpoint, so you can carefully drop down here to activate it. | # Ride all the way to the end: This positions you above the bell that opens the final checkpoint, so you can carefully drop down here to activate it. | ||
| − | #* Crucially, as long as you don't activate the final checkpoint, your current checkpoint is still 10. This means you can complete the Shortcut for the daily, activate the bell, then /GG or drop into the void to reset to the checkpoint for the detour(s) below. | + | #* Crucially, as long as you don't activate the final checkpoint, your current checkpoint is still 10. This means you can complete the Shortcut for the ''Academic Probation'' daily, activate the bell, then /GG or drop into the void to reset to the checkpoint for the detour(s) below. |
#* If you are in a group and one player doesn't mind skipping the digs, one player can remain here while the others reset to checkpoint 10 to complete dailies. Once they are done, the player that remained can activate the final checkpoint and the other players can reset to skip the process of getting back here. | #* If you are in a group and one player doesn't mind skipping the digs, one player can remain here while the others reset to checkpoint 10 to complete dailies. Once they are done, the player that remained can activate the final checkpoint and the other players can reset to skip the process of getting back here. | ||
| + | If you don't want any of the optional things, you can skip to the [[Guide:Daily_Super_Adventure_Box_W2Z2#Checkpoint12|last section]]. | ||
| − | |||
| − | |||
| + | ==Checkpoint 10 (optional)== | ||
| + | This entire section is a detour, but it is worth it if you don't have an issue with the final trampoline section. | ||
| + | Upon appearing here, you will immediately be set upon by two assassins. Dispatch them, as they're a nuisance and have a decent chance of spawning five baubles each. | ||
| + | <div style="border:2px solid #292929;"> | ||
| + | <div style="padding:0.5rem;text-align:left;background:#1d1d1d;color:#fff;border-bottom:1px solid #111111;border-top:1px solid #292929;">'''Optional: Environmental Science 202 and 90 baubles'''</div><div style="background:#171717;padding:0.5rem;"> | ||
| + | This detour isn't worth it for the baubles alone, so only go for the daily. | ||
| − | + | Rather than progress through the checkpoint, turn around and go all the way along the wooden walkway. Carefully jump across to a small flower pot, then to the right to reach the pagoda. Head around the outside of the pagoda to the right. | |
| − | |||
| − | |||
| − | |||
| − | |||
| − | |||
| − | |||
| − | + | Jump across to the grassy area here, and climb up the tree. From here you can jump back across to a higher level of the pagoda. | |
| − | + | Walk all the way around to find some clouds you can use to jump up to the next level, then jump onto the corner spike to reach another set of clouds that take you up to the roof. | |
| − | + | Run all the way back across the roof and stand on top of the pillar. You want to make a long jump all the way down to a set of leaves over the edge of the hill. Jump across to reach a boost flower that takes you to a new area. | |
| − | |||
| − | Jump | ||
[[file:W2Z1 Chest 1.png|Location of chest|405px|class=img-fluid]] | [[file:W2Z1 Chest 1.png|Location of chest|405px|class=img-fluid]] | ||
| − | + | Ahead of you are some hillbillies, and on the cliff just past them is a dig for 20 baubles. | |
| − | + | Some raccoons will appear shortly and start stealing from the hillbillies. You can follow them through the maze to reach the tree stump, but bear right shortly after entering the maze to find another dig spot for 20 baubles. | |
| − | + | Eventually you will find the tree stump in an area littered with explosive barrels. Destroy the stump, and raccoon kingpin if necessary. | |
| − | + | Finally, look nearby for an area of slightly darker grass. Through a bomb near it and it should reveal a hole you can drop down to. The room inside is dark and has poisoned water, so carefully make your way along to a [mystic? guru?]. Stand on the flower and use the wall-opening song [332331?] to reveal a 50-bauble. /GG to reset to the checkpoint. | |
[[File:W2Z1 Dig 4.mp4|gif|405px]] | [[File:W2Z1 Dig 4.mp4|gif|405px]] | ||
</div></div> | </div></div> | ||
| − | |||
| − | |||
<div style="border:2px solid #292929;"> | <div style="border:2px solid #292929;"> | ||
| − | <div style="padding:0.5rem;text-align:left;background:#1d1d1d;color:#fff;border-bottom:1px solid #111111;border-top:1px solid #292929;">'''Optional: | + | <div style="padding:0.5rem;text-align:left;background:#1d1d1d;color:#fff;border-bottom:1px solid #111111;border-top:1px solid #292929;">'''Optional: Ooze Transportation 202'''</div><div style="background:#171717;padding:0.5rem;"> |
| − | + | This is a long and difficult route, so it is strongly recommended to avoid this daily if possible. | |
| − | + | Start the route as in the detour above, but rather then climb up the tree, drop down to the left instead to find a stone area with the oozes. | |
| − | |||
| − | |||
| − | |||
| − | |||
| + | After you dig one up and beat it into submission, continue backtracking past the little house with the toads, and jump down to Checkpoint 8 below. | ||
| − | + | You'll need to carefully jump back along the trail of platforms until you reach a path of clouds. Take these all the way and you'll eventually end up climbing up a hill. Past this hill, you should be able to see a distant building that houses the Ooze Farmer. You can then drop into the void to reset to the checkpoint. | |
| − | + | As we are backtracking to this location rather than doing it "normally", the route is slightly longer than it would usually take (where we can come from Checkpoint 9) if we fail at any point and have to retry. | |
| − | |||
| − | |||
| − | |||
| − | |||
| − | |||
| − | |||
| − | |||
| − | |||
| − | |||
| − | |||
| − | |||
| − | |||
| − | |||
| − | |||
| − | |||
| − | |||
| − | |||
| − | |||
| − | |||
| − | |||
| − | |||
| − | |||
<gallery mode="packed" heights=300px style="text-align:left"> | <gallery mode="packed" heights=300px style="text-align:left"> | ||
| − | file:W2Z1 Detour | + | file:W2Z1 Detour 3.png|Avoid the flower and head along the cliff to the left. |
| − | + | file:W2Z1 Dig 5.png|Follow the path carefully and dig from around the corner. | |
| − | |||
| − | file:W2Z1 Dig | ||
</gallery> | </gallery> | ||
</div></div> | </div></div> | ||
| − | + | Whether or not you do the previous detours, drop down to a grassy platform just behind the checkpoint and dig for 50 baubles. Drop into the void to reset and you can finally continue into the level. | |
| − | |||
| − | |||
| − | + | [[file:W2Z1 Dig 6.png|Dig and drop down to activate the checkpoint.|405px|class=img-fluid]] | |
| − | |||
| − | |||
| − | file:W2Z1 | ||
| − | |||
| − | |||
| − | |||
| − | The | + | The platform past the checkpoint has three teleporters on it. This is the start of a kind of maze of platforms with teleporters, through which there are two main routes. The first route is longer and involves some difficult jumps, but allows you to collect 50 baubles and the glitch. The second route is theoretically faster, but is chock-full of explosive barrels and assassins, so navigating it safely may take longer than the main route. The first teleporter choice actually doesn't matter as both platforms you end up on can take you to either route, and have a single assassin on them. |
| − | |||
| − | The | ||
| − | |||
| − | |||
| − | |||
| − | |||
| − | |||
| − | |||
| − | + | ==="Fast" route=== | |
| + | To take the second route and skip the detour, take teleporters in either of the following orders: | ||
| + | * left, right, right, forward, forward | ||
| + | * forward, forward, right, forward, forward | ||
| − | + | This puts you on a platform with a cloud nearby you can jump on to reach the final location with the boss, so skip ahead to the next section. | |
| − | |||
| − | + | ===Glitch route=== | |
| + | For the glitch, take teleporters in either of the following orders: | ||
| + | * left, forward | ||
| + | * forward, left | ||
| − | + | This will put you on a platform with checkpoint 11 and an assassin. If you want the glitch and also wish to avoid tricky jumps, it is possible to activate the glitch without activating the checkpoint: | |
| − | |||
| − | |||
| − | |||
| − | |||
| − | |||
| − | |||
| + | Angle your camera to look below the platform you're on. You should be able to spot the red glitch crystal below. What you want to do is start throwing your bomb, then quickly walk backwards off the ledge so that you throw as you fall past the glitch. This activates it, and places you back at Checkpoint 10, so you can take the other route through the teleporters. Failing will mean you have to take the teleporters back here. | ||
| − | + | It is also possible to perform a very tricky jump ''around'' the checkpoint to the left of it, allowing you to access both the 50-bauble dig and the glitch while still taking the other route to avoid the jumps. However, if you can manage this jump, you can probably handle the trampoline section anyway so its value is limited. | |
| − | |||
| − | |||
| − | |||
| − | |||
| − | |||
| − | + | ===Checkpoint 11 (optional)=== | |
| + | Otherwise, activate the checkpoint and try to use the boost to launch yourself up to the furniture shop directly above you. Leaving this shop and going outside will put you next to a crystal that creates several planks below you. You'll need to very carefully drop off to land on one, then jump along them to reach the glitch crystal. There's no escaping a drop into the void afterwards. | ||
| − | + | If you failed to use the boost, go through the checkpoint and jump along the small platforms up and to the left to reach the top of the building. | |
| − | |||
| − | + | Finally, head through the checkpoint and jump along the small platforms, heading right. Soon you'll see a platform with an explosive barrel on top of it. This will usually explode when you land on it, so make sure you have more than one heart, and try to land in the centre of the platform. This way the explosion will not knock you into the void. Dig here for 50 baubles. | |
<gallery mode="packed" heights=300px style="text-align:left"> | <gallery mode="packed" heights=300px style="text-align:left"> | ||
| − | file:W2Z1 Detour | + | file:W2Z1 Detour 4-1.png|Climb up the hill then jump up the cliff. |
| − | file:W2Z1 Detour | + | file:W2Z1 Detour 4-2.png|Long jump onto the small rock then walk through the waterfall. |
| − | file:W2Z1 | + | file:W2Z1 Detour 4-3.png|Two jumps to a platform, then bomb the wall. |
| − | file:W2Z1 Dig | + | file:W2Z1 Dig 8.png|Dig. |
| − | |||
</gallery> | </gallery> | ||
| − | |||
| − | |||
| − | |||
| − | |||
| − | |||
| − | |||
| − | |||
| − | |||
| − | |||
| − | |||
| − | |||
| − | |||
| − | |||
| − | |||
| − | |||
| − | |||
| − | |||
| − | |||
| − | |||
| − | |||
| − | |||
| − | |||
| − | |||
| − | |||
| − | |||
| − | |||
| − | |||
| − | |||
| − | |||
| − | |||
| − | |||
| − | |||
| − | |||
| − | |||
| − | |||
| − | |||
| − | |||
| − | |||
| − | |||
| − | |||
| − | |||
| − | |||
| − | |||
| − | + | You can now carry on along the platforms and trampolines and past the piranha pools to reach the final location. | |
| − | ==Checkpoint | + | ==Checkpoint 12== |
If doing ''Ooze Transportation 201'', head up the hill to the right of the checkpoint, jump back over the gap, and use the flower to launch yourself over to the farmer. | If doing ''Ooze Transportation 201'', head up the hill to the right of the checkpoint, jump back over the gap, and use the flower to launch yourself over to the farmer. | ||
Revision as of 18:30, 3 June 2024
WIP
Start
W2Z2 is probably the least rewarding zone for the time investment, and as such the run is pretty much a straight run to the shortcut eagle with only a few detours listed for extra baubles and dailies.
Due to the extreme amount of extra time that locksmithing 202 would take, it is never recommended and this guide will not cover chests. The wiki has a complete guide for the level that covers them.
Run as usual all the way to the first checkpoint and activate it.
Checkpoint 1
Immediately turn around and perform a long jump down to a small platform (to the right when facing the checkpoint). Dig here for 50 baubles then drop into the void to reset to the checkpoint.

Run forward, avoiding the assassins and pick up the extra life on the way (watch out for the dart trap!). Head to the right of the hill past the exploding barrel (avoiding more assassins) and climb up the tree. Jump across to a small pillar with another assassin on top. You don't need to kill them, but it may be easier.
Dig on top of the pillar for 20 baubles.
Drop down carefully to the left of the checkpoint.
A slightly longer, but safer path to the right of the checkpoint.
Dig here. You can drop into the void or /GG to reset to the checkpoint.


Turn and face checkpoint 2 in the distance. If you look down you can see a plant a long way below. Do a long jump and continue pressing forward as you fall to land on it - it is much easier than it looks. Continue up the hill to activate the next checkpoint.
Checkpoint 2
Drop down, kill the assassins and feed the octopus to raise the platform.
Checkpoint 3
Continue forward and look out for the toad hiding behind the wall.
Head left and use the flower to boost over the gap and climb up the tree and round the cliffs to the right. If you're only interested in the shop, you can jump down to the boost flower on the other side. Otherwise, continue on towards the pagoda past the assassins and turn left when you reach it - DO NOT activate the checkpoint.
Drop down to the grassy area and walk along beneath the wooden platform and dig. You can now drop into the void or /GG to return to the checkpoint, or if you want the shop as well, use the wooden beams to backtrack and jump across to the boost flower mentioned earlier. Then drop into the void or /GG.
Walk back up the hill, but turn right instead. Make a long jump across to a cloud - a dodge jump isn't required but is very helpful as the change in elevation of the hill can make your character "catch" on the terrain and reduce their jump distance. Once here, jump again before the cloud collapses, knock the block and use it to climb up to the Shortcut eagle. Wait for it to finish talking and you'll be transported.
Shortcut Eagle
Throughout this section, waves of owls will come at you and damage you if they hit. You can dodge these and try to collect a few baubles, but it's much easier to just move so you're directly behind the eagle's head, which will protect you.
This shortcut takes you all the way to the final checkpoint, but you can jump off the eagle early to end up at additional locations. As the terrain below passes quickly, the easiest way to track your position is by the waves of owls that come in. Multiple sets of owl waves spawn, with longer gaps in between:
- Drop off before the first set: Return to checkpoint 3
- Drop off sometime between the first set and after the second set: Checkpoint 6. This is frankly a disaster if you accidentally end up here as it strands you in the middle of the level and forces you to complete a long section to get back on track. It is faster to quit and start the entire level again.
- Drop off sometime after the third set appears: Checkpoint 10. This is a very useful trick, as it allows you to reach the glitch, the tree stump and some extra digs while still leaving you close to the end. You can drop off as soon as you see the third set of owls, but if in doubt you can always delay a bit to entire you don't end up at checkpoint 6.
- Ride all the way to the end: This positions you above the bell that opens the final checkpoint, so you can carefully drop down here to activate it.
- Crucially, as long as you don't activate the final checkpoint, your current checkpoint is still 10. This means you can complete the Shortcut for the Academic Probation daily, activate the bell, then /GG or drop into the void to reset to the checkpoint for the detour(s) below.
- If you are in a group and one player doesn't mind skipping the digs, one player can remain here while the others reset to checkpoint 10 to complete dailies. Once they are done, the player that remained can activate the final checkpoint and the other players can reset to skip the process of getting back here.
If you don't want any of the optional things, you can skip to the last section.
Checkpoint 10 (optional)
This entire section is a detour, but it is worth it if you don't have an issue with the final trampoline section.
Upon appearing here, you will immediately be set upon by two assassins. Dispatch them, as they're a nuisance and have a decent chance of spawning five baubles each.
This detour isn't worth it for the baubles alone, so only go for the daily.
Rather than progress through the checkpoint, turn around and go all the way along the wooden walkway. Carefully jump across to a small flower pot, then to the right to reach the pagoda. Head around the outside of the pagoda to the right.
Jump across to the grassy area here, and climb up the tree. From here you can jump back across to a higher level of the pagoda.
Walk all the way around to find some clouds you can use to jump up to the next level, then jump onto the corner spike to reach another set of clouds that take you up to the roof.
Run all the way back across the roof and stand on top of the pillar. You want to make a long jump all the way down to a set of leaves over the edge of the hill. Jump across to reach a boost flower that takes you to a new area.

Ahead of you are some hillbillies, and on the cliff just past them is a dig for 20 baubles.
Some raccoons will appear shortly and start stealing from the hillbillies. You can follow them through the maze to reach the tree stump, but bear right shortly after entering the maze to find another dig spot for 20 baubles.
Eventually you will find the tree stump in an area littered with explosive barrels. Destroy the stump, and raccoon kingpin if necessary.
Finally, look nearby for an area of slightly darker grass. Through a bomb near it and it should reveal a hole you can drop down to. The room inside is dark and has poisoned water, so carefully make your way along to a [mystic? guru?]. Stand on the flower and use the wall-opening song [332331?] to reveal a 50-bauble. /GG to reset to the checkpoint.
This is a long and difficult route, so it is strongly recommended to avoid this daily if possible.
Start the route as in the detour above, but rather then climb up the tree, drop down to the left instead to find a stone area with the oozes.
After you dig one up and beat it into submission, continue backtracking past the little house with the toads, and jump down to Checkpoint 8 below.
You'll need to carefully jump back along the trail of platforms until you reach a path of clouds. Take these all the way and you'll eventually end up climbing up a hill. Past this hill, you should be able to see a distant building that houses the Ooze Farmer. You can then drop into the void to reset to the checkpoint.
As we are backtracking to this location rather than doing it "normally", the route is slightly longer than it would usually take (where we can come from Checkpoint 9) if we fail at any point and have to retry.
Avoid the flower and head along the cliff to the left.
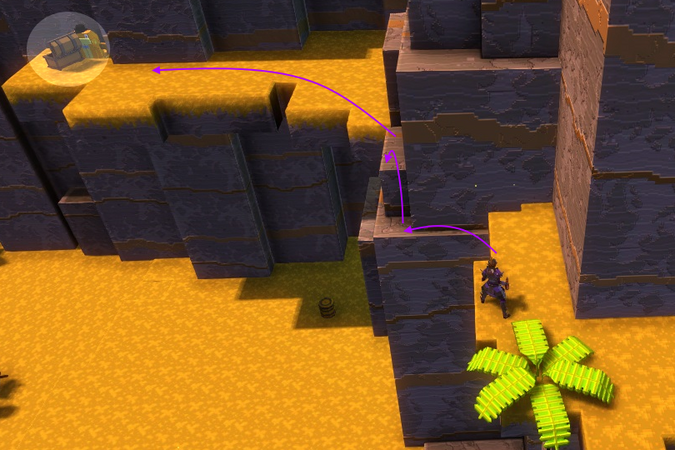
Follow the path carefully and dig from around the corner.


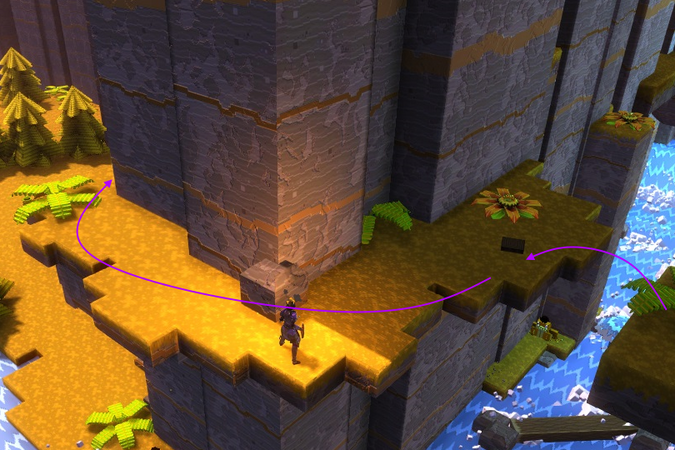
Whether or not you do the previous detours, drop down to a grassy platform just behind the checkpoint and dig for 50 baubles. Drop into the void to reset and you can finally continue into the level.

The platform past the checkpoint has three teleporters on it. This is the start of a kind of maze of platforms with teleporters, through which there are two main routes. The first route is longer and involves some difficult jumps, but allows you to collect 50 baubles and the glitch. The second route is theoretically faster, but is chock-full of explosive barrels and assassins, so navigating it safely may take longer than the main route. The first teleporter choice actually doesn't matter as both platforms you end up on can take you to either route, and have a single assassin on them.
"Fast" route
To take the second route and skip the detour, take teleporters in either of the following orders:
- left, right, right, forward, forward
- forward, forward, right, forward, forward
This puts you on a platform with a cloud nearby you can jump on to reach the final location with the boss, so skip ahead to the next section.
Glitch route
For the glitch, take teleporters in either of the following orders:
- left, forward
- forward, left
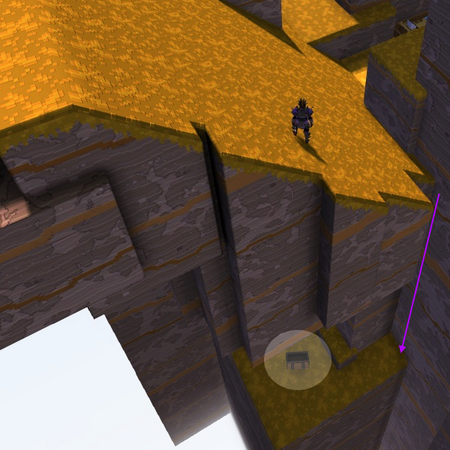
This will put you on a platform with checkpoint 11 and an assassin. If you want the glitch and also wish to avoid tricky jumps, it is possible to activate the glitch without activating the checkpoint:
Angle your camera to look below the platform you're on. You should be able to spot the red glitch crystal below. What you want to do is start throwing your bomb, then quickly walk backwards off the ledge so that you throw as you fall past the glitch. This activates it, and places you back at Checkpoint 10, so you can take the other route through the teleporters. Failing will mean you have to take the teleporters back here.
It is also possible to perform a very tricky jump around the checkpoint to the left of it, allowing you to access both the 50-bauble dig and the glitch while still taking the other route to avoid the jumps. However, if you can manage this jump, you can probably handle the trampoline section anyway so its value is limited.
Checkpoint 11 (optional)
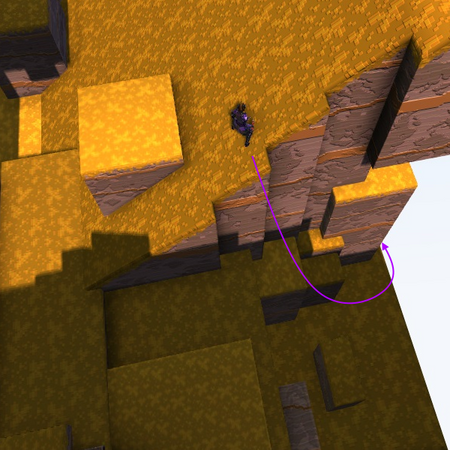
Otherwise, activate the checkpoint and try to use the boost to launch yourself up to the furniture shop directly above you. Leaving this shop and going outside will put you next to a crystal that creates several planks below you. You'll need to very carefully drop off to land on one, then jump along them to reach the glitch crystal. There's no escaping a drop into the void afterwards.
If you failed to use the boost, go through the checkpoint and jump along the small platforms up and to the left to reach the top of the building.
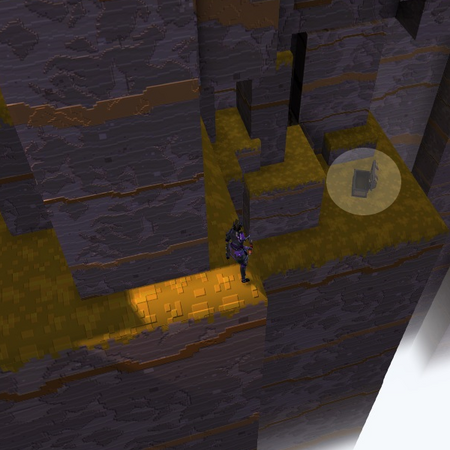
Finally, head through the checkpoint and jump along the small platforms, heading right. Soon you'll see a platform with an explosive barrel on top of it. This will usually explode when you land on it, so make sure you have more than one heart, and try to land in the centre of the platform. This way the explosion will not knock you into the void. Dig here for 50 baubles.
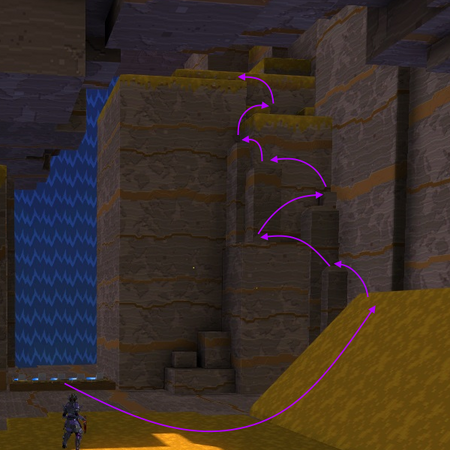
Climb up the hill then jump up the cliff.
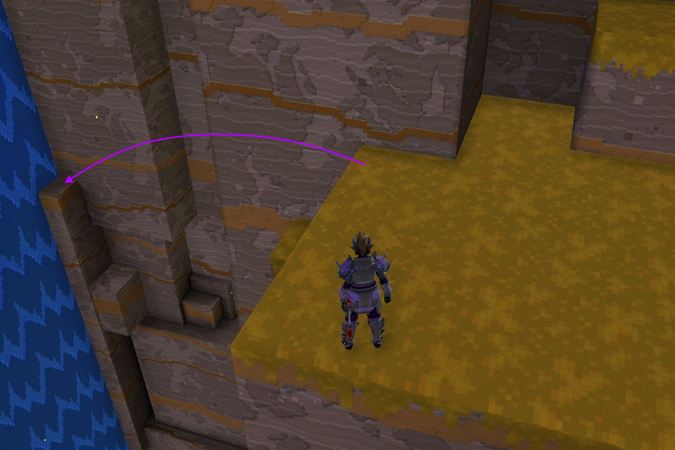
Long jump onto the small rock then walk through the waterfall.
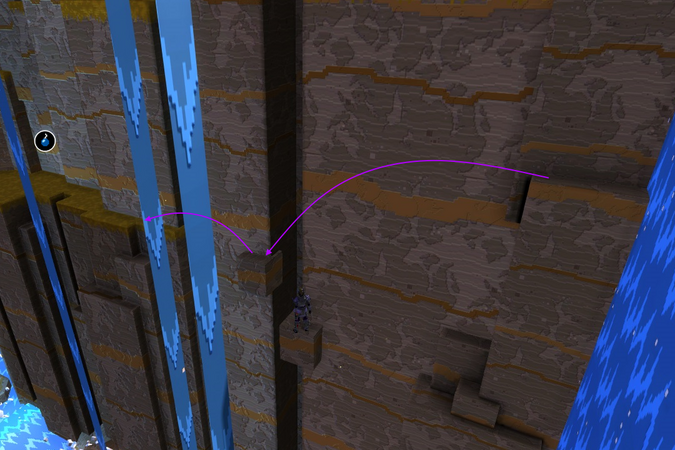
Two jumps to a platform, then bomb the wall.
Dig.


You can now carry on along the platforms and trampolines and past the piranha pools to reach the final location.
Checkpoint 12
If doing Ooze Transportation 201, head up the hill to the right of the checkpoint, jump back over the gap, and use the flower to launch yourself over to the farmer.

Otherwise, head forward, take the flower over to the cage, defeat the boss and finish the level!
Comments
Enjoy an ad-free experience & support the website, for only $1 per month! Upgrade to Premium