Difference between revisions of "Daily Super Adventure Box W2Z1"
(Created page with "<big>'''WIP'''</big> ==Start== Start by following the happy hand up the cliffs to the right and along the wooden bridge. Activate the first checkpoint. <div style="border:2...") |
|||
| (8 intermediate revisions by the same user not shown) | |||
| Line 6: | Line 6: | ||
<div style="border:2px solid #292929;"> | <div style="border:2px solid #292929;"> | ||
| − | <div class="row" style="padding:0.5rem;text-align:left;background:#1d1d1d;color:#fff;border-bottom:1px solid #111111;border-top:1px solid #292929;"><div class="col-md">'''Optional: 70 baubles'''</div><div class="col-md" style="text-align:right;">[[file: | + | <div class="row" style="padding:0.5rem;text-align:left;background:#1d1d1d;color:#fff;border-bottom:1px solid #111111;border-top:1px solid #292929;"><div class="col-md">'''Optional: 70 baubles'''</div><div class="col-md" style="text-align:right;">[[file:Gg.png|GG required for efficiency|24px]] </div></div><div style="background:#171717;padding:0.5rem;"> |
Take the speed boost from the nearby barrel and run all the way along the bridge behind you, be careful as it will collapse behind you. | Take the speed boost from the nearby barrel and run all the way along the bridge behind you, be careful as it will collapse behind you. | ||
| Line 20: | Line 20: | ||
Turn left and walk into the waterfall. Dig at the back of the room for 20 baubles, then jump along the series of water spouts to reach another 20 baubles. /gg to return to the checkpoint. | Turn left and walk into the waterfall. Dig at the back of the room for 20 baubles, then jump along the series of water spouts to reach another 20 baubles. /gg to return to the checkpoint. | ||
<gallery mode="packed" heights=300px> | <gallery mode="packed" heights=300px> | ||
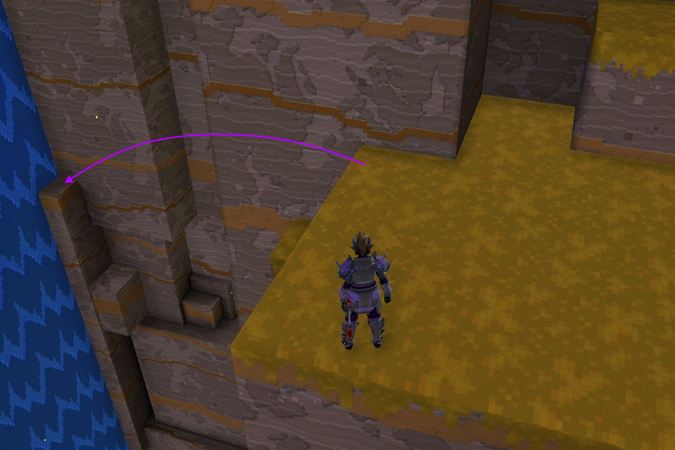
| − | File: | + | File:W2Z1 Detour 1.png|Run along the bridge after activating the checkpoint. |
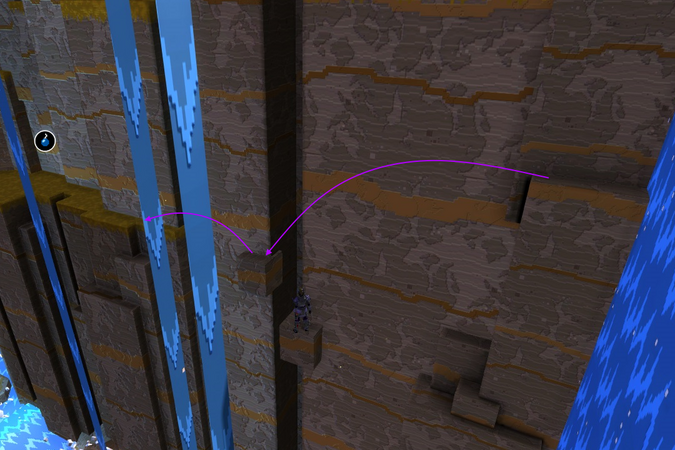
| − | File: | + | File:W2Z1 Detour 2.png|At the end of the bridge, jump to the right and round the corner. |
| − | File: | + | File:W2Z1 Dig 1.png|Climb up and jump over the river and dig in the small pool. |
| − | File: | + | </gallery> |
| + | <gallery mode="packed" heights=300px> | ||
| + | File:W2Z1 Secret 1.png|At ground level, run into the waterfall here. | ||
| + | File:W2Z1 Dig 2.png|Dig at the back of the room. | ||
| + | File:W2Z1 Bauble 1.png|Location of the bauble at the end of the path of water spouts. | ||
</gallery> | </gallery> | ||
</div></div> | </div></div> | ||
| Line 30: | Line 34: | ||
==Checkpoint 1== | ==Checkpoint 1== | ||
Make your way along the series of crocodiles and turtles and up the cliff to reach the next checkpoint. | Make your way along the series of crocodiles and turtles and up the cliff to reach the next checkpoint. | ||
| − | |||
| − | |||
| − | |||
| Line 39: | Line 40: | ||
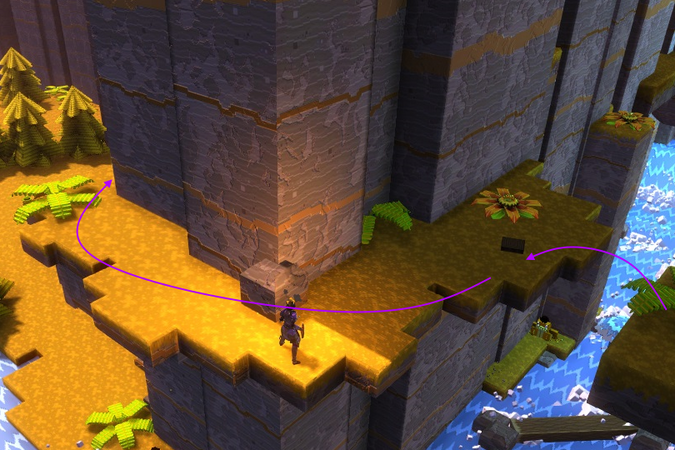
Before crossing the long bridge, drop down to the left and dig for an easy 50 baubles. For a safer but slower path, climb down to the right of the checkpoint. | Before crossing the long bridge, drop down to the left and dig for an easy 50 baubles. For a safer but slower path, climb down to the right of the checkpoint. | ||
| − | + | <gallery mode="packed" heights=300px style="text-align:left"> | |
| − | + | file:W2Z1 Dig 3 left.png|Drop down carefully to the left of the checkpoint. | |
| + | file:W2Z1 Dig 3 right.png|A slightly longer, but safer path to the right of the checkpoint. | ||
| + | file:W2Z1 Dig 3.png|Dig here. | ||
| + | </gallery> | ||
Take the speed boost from the barrel and run across the bridge. If you don't stop, the assassins ''shouldn't'' hit you. | Take the speed boost from the barrel and run across the bridge. If you don't stop, the assassins ''shouldn't'' hit you. | ||
| − | |||
| − | |||
| Line 61: | Line 63: | ||
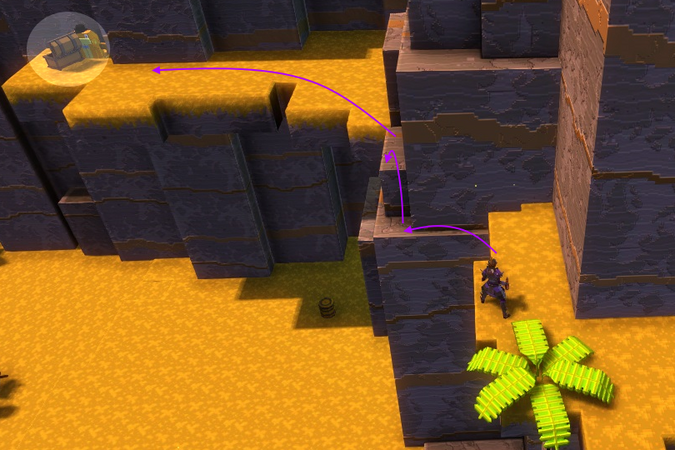
The first shop is immediately to your left | The first shop is immediately to your left | ||
| − | [[file: | + | [[file:W2Z1 Shop 1.png|Location of shop|405px|class=img-fluid]] |
</div></div> | </div></div> | ||
Jump to the rock, hit the crocodile, then jump across to the flower. Rather than jump left to the cliff, carefully drop down instead to hit another flower that launches you into the waterfall. | Jump to the rock, hit the crocodile, then jump across to the flower. Rather than jump left to the cliff, carefully drop down instead to hit another flower that launches you into the waterfall. | ||
| + | |||
| + | [[file:W2Z1 Secret 2.png|Carefully drop down to the flower to be launched through the waterfall.|405px|class=img-fluid]] | ||
| + | |||
Move fast past the bear and grab the 10 baubles as you go. Climb up the cliffs at the end and burn the tree before dropping down to the left. | Move fast past the bear and grab the 10 baubles as you go. Climb up the cliffs at the end and burn the tree before dropping down to the left. | ||
| − | |||
| − | |||
Head up the hill, avoiding the bear if possible. | Head up the hill, avoiding the bear if possible. | ||
| − | [[file: | + | [[file:W2Z1 Secrets 3.jpg|View from the hill. Detour to the left, main route to the right.|405px|class=img-fluid]] |
<div style="border:2px solid #292929;"> | <div style="border:2px solid #292929;"> | ||
<div style="padding:0.5rem;text-align:left;background:#1d1d1d;color:#fff;border-bottom:1px solid #111111;border-top:1px solid #292929;">'''Optional: Locksmithing 201 and 55 baubles'''</div><div style="background:#171717;padding:0.5rem;"> | <div style="padding:0.5rem;text-align:left;background:#1d1d1d;color:#fff;border-bottom:1px solid #111111;border-top:1px solid #292929;">'''Optional: Locksmithing 201 and 55 baubles'''</div><div style="background:#171717;padding:0.5rem;"> | ||
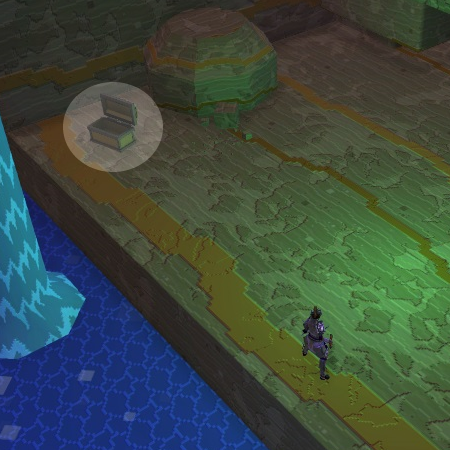
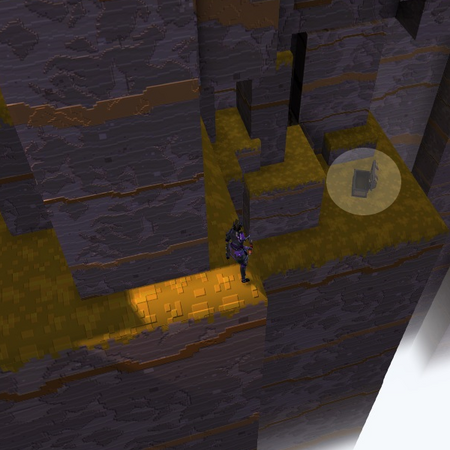
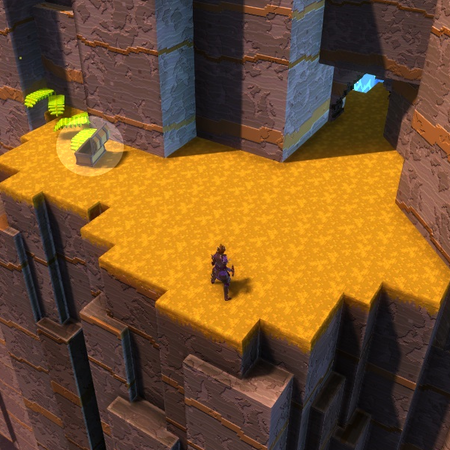
Jump left across the cliffs and the chest is in plain sight. | Jump left across the cliffs and the chest is in plain sight. | ||
| + | |||
| + | [[file:W2Z1 Chest 1.png|Location of chest|405px|class=img-fluid]] | ||
| + | |||
Just past the chest is a bear. Kill it (finger kills it instantly). | Just past the chest is a bear. Kill it (finger kills it instantly). | ||
| Line 87: | Line 93: | ||
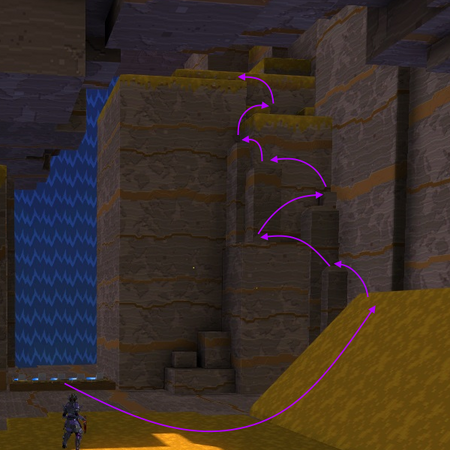
Make two jumps to an area above the location you entered at, and dig. Jump down and repeat the loop all the way back to the hill. | Make two jumps to an area above the location you entered at, and dig. Jump down and repeat the loop all the way back to the hill. | ||
| + | |||
| + | [[File:W2Z1 Dig 4.mp4|gif|405px]] | ||
| + | |||
| + | |||
| + | </div></div> | ||
| + | |||
| + | |||
| + | Facing away, on the right cliff is a toad. This one has a habit of seeing you as you approach, so it may be a good idea to stun it with a boomerang before killing it. Jump across the small gap and burn the nearby tree. | ||
| + | |||
| + | <div style="border:2px solid #292929;"> | ||
| + | <div style="padding:0.5rem;text-align:left;background:#1d1d1d;color:#fff;border-bottom:1px solid #111111;border-top:1px solid #292929;">'''Optional: 50 baubles'''</div><div style="background:#171717;padding:0.5rem;"> | ||
| + | Before moving forward, head left along the cliff, killing the toad immediately round the corner. Continue along this way until you see another toad. Rather than kill it, stand just around the corner and dig for 50 baubles. Return to where you were. | ||
| + | |||
| + | <gallery mode="packed" heights=300px style="text-align:left"> | ||
| + | file:W2Z1 Detour 3.png|Avoid the flower and head along the cliff to the left. | ||
| + | file:W2Z1 Dig 5.png|Follow the path carefully and dig from around the corner. | ||
| + | </gallery> | ||
| + | </div></div> | ||
| + | |||
| + | |||
| + | Bounce along the two flowers, and dig for 20 baubles. Jump down onto the checkpoint. | ||
| + | |||
| + | [[file:W2Z1 Dig 6.png|Dig and drop down to activate the checkpoint.|405px|class=img-fluid]] | ||
| + | |||
| + | |||
| + | <div style="border:2px solid #292929;"> | ||
| + | <div style="padding:0.5rem;text-align:left;background:#1d1d1d;color:#fff;border-bottom:1px solid #111111;border-top:1px solid #292929;">'''Optional: 20 baubles'''</div><div style="background:#171717;padding:0.5rem;"> | ||
| + | 20 more baubles can be obtained by backtracking down the river. You can jump part way then just let the current drag you along, hitting any creatures along the way and sticking to the left wall. As you reach a dry area just before the waterfall, hop up and dig. Then /gg or jump over the waterfall to return to the checkpoint. | ||
| + | |||
| + | [[file:W2Z1 Dig 7.png|Dig, then /GG or drop off the cliff to return to the checkpoint.|405px|class=img-fluid]] | ||
| + | </div></div> | ||
| + | |||
| + | |||
| + | ==Checkpoint 5== | ||
| + | Head forward across the rocks, logs and turtles, to the next checkpoint. | ||
| + | |||
| + | |||
| + | ==Checkpoint 6== | ||
| + | There are a number of diversions for baubles at this point. Two of them take you close to the next area, so they will be listed last. | ||
| + | |||
| + | <div style="border:2px solid #292929;"> | ||
| + | <div style="padding:0.5rem;text-align:left;background:#1d1d1d;color:#fff;border-bottom:1px solid #111111;border-top:1px solid #292929;">'''Optional: 55 baubles'''</div><div style="background:#171717;padding:0.5rem;"> | ||
| + | Head up the hill to your immediate left, then jump across to a small outcrop. The jump is quite long, so a dodge-jump will help, but isn't required. Climb all the way to the top. From this flat area, you want to make another long jump to the topmost rock that is inside the waterfall. Again, a dodge-jump isn't required but is helpful. | ||
| + | |||
| + | Carefully walk through the waterfall, and make three more (easier) jumps along the cliff. Bomb the wall at the end to reveal 5 baubles, then dig to the right of it for 50. /gg or jump off the cliff to return to the waterfall. | ||
<gallery mode="packed" heights=300px> | <gallery mode="packed" heights=300px> | ||
| − | + | file:W2Z1 Detour 4-1.png|Climb up the hill then jump up the cliff. | |
| − | + | file:W2Z1 Detour 4-2.png|Long jump onto the small rock then walk through the waterfall. | |
| − | + | file:W2Z1 Detour 4-3.png|Two jumps to a platform and bomb the wall. | |
| − | + | file:W2Z1 Dig 8.png|Dig. | |
| − | |||
</gallery> | </gallery> | ||
</div></div> | </div></div> | ||
| − | + | <div style="border:2px solid #292929;"> | |
| + | <div style="padding:0.5rem;text-align:left;background:#1d1d1d;color:#fff;border-bottom:1px solid #111111;border-top:1px solid #292929;">'''Optional: Environmental Science 201 and 20 baubles'''</div><div style="background:#171717;padding:0.5rem;"> | ||
| + | The 20 baubles are just about worth it, but a /gg is required to make it efficient. | ||
| + | |||
| + | Head into the woods, and bear (aha) right, following the wall and trees until you see a toad. Kill it, then dig past the barrel for 20 baubles. Backtrack to the most recent junction, take the right path, and then hug the trees on your left until you reach an opening with a Stump. This is guarded by a Raccoon Kingpin, who is much more dangerous than the Queen Beedogs in world 1, so going here other than for the daily is even less recommended. /gg or backtrack to the checkpoint. | ||
| + | |||
| + | [[file:W1Z3 Shop 6.png|Shop|405px|class=img-fluid]] | ||
| + | </div></div> | ||
| + | |||
| + | The next two routes provide a lot of baubles, or the glitch. Both these routes take you to the other side of the river (or close enough), so can be used to progress. Otherwise you'll need to make your way across the river normally. | ||
| + | |||
| + | The 20 baubles at the start of the glitch route are good to get regardless of whether you go for the glitch. | ||
| + | |||
| + | |||
| + | <div style="border:2px solid #292929;"> | ||
| + | <div style="padding:0.5rem;text-align:left;background:#1d1d1d;color:#fff;border-bottom:1px solid #111111;border-top:1px solid #292929;">'''Optional: Interior Design 201, Glitch and 20 baubles'''</div><div style="background:#171717;padding:0.5rem;"> | ||
| + | Follow the hand to the right to a large river. First, turn right and bomb the waterfall, then walk inside for 20 baubles. | ||
| + | |||
| + | For the glitch, we need to go all the way down the river (look to the left for the water spout just in front of the waterfall). You can jump in without worrying about logs and walk towards the rock next to the spout. From this rock, jump to the spout, then again to dry land. | ||
| + | |||
| + | Make a series of jumps down and to the right, the along the cliff to the left. Climb all the way back up the cliff. | ||
| + | |||
| + | Jump up onto the rock, then the bouncy mushroom and land on the flower, which will launch you across to a new area. Bounce up the mushroom. | ||
| + | |||
| + | Another shop is on the left, and the glitch crystal is to the right. Hit the crystal with a ranged weapon, then jump along the boards that appear. Melee the crystal again as you go past it and carry on, into the waterfall to find the glitch crystal. | ||
| + | |||
| + | If you aren't interested in the final route, you can make a big jump back through the waterfall towards the far end of the river. You won't make it, but you should be close enough to safely wade the remaining distance. If you manage to make it to the area with the burnable trees, you can dig for 50 baubles (see the end of the next optional route for details). Otherwise /gg to return to the checkpoint. | ||
| + | |||
| + | [[file:W1Z3 Shop 6.png|Shop|405px|class=img-fluid]] | ||
| + | </div></div> | ||
| + | |||
<div style="border:2px solid #292929;"> | <div style="border:2px solid #292929;"> | ||
| − | <div style="padding:0.5rem;text-align:left;background:#1d1d1d;color:#fff;border-bottom:1px solid #111111;border-top:1px solid #292929;">'''Optional: | + | <div style="padding:0.5rem;text-align:left;background:#1d1d1d;color:#fff;border-bottom:1px solid #111111;border-top:1px solid #292929;">'''Optional: 100 baubles'''</div><div style="background:#171717;padding:0.5rem;"> |
| − | The | + | The next route has some tricky sections, but a good number of baubles once you learn it. |
| + | |||
| + | Walk forward from the checkpoint towards the hillbillies. Head to the cliff edge to their left and look down. You goal is to drop down and move yourself forward while falling to land in the area below. | ||
| + | |||
| + | From here, jump down towards the river. Follow it upstream, then at the end you will see a small section of "rapids", with small rocks on either side. | ||
| + | |||
| + | Jump up these rocks. If you're careful, you should be able to hold your position even if you get knocked down by the water. Jump into the bouncy mushroom, then the next, and land on the area above, overlooking the checkpoint. | ||
| + | |||
| + | Face the topmost section and dig, then look back down to see a yellow bauble. Jump down, and bomb the crumbly wall next to it. Prepare yourself to move fast when you head inside. | ||
| + | |||
| + | This area is infested with hillbillies. The best thing to do it just run and hope they don't shoot you. Head right immediately, then follow the wall on your left all the way along. Just past a long section with a barrel at the end, you will find an exit, but make sure to pick up the 20 baubles just to the right of it first. | ||
| + | |||
| + | Immediately through, you'll be face to face with a bear. Finger it. Then dig just past it for 50 baubles. | ||
| − | [[file:W1Z3 | + | Burn the trees, then downriver and to the right. |
| + | |||
| + | [[file:W1Z3 Shop 6.png|Shop|405px|class=img-fluid]] | ||
</div></div> | </div></div> | ||
| − | + | However you reach the other side of the river, there is another shop, with a checkpoint to the right. Watch out for the hillbillies and explosive barrels. | |
| + | |||
| + | |||
| + | ==Checkpoint 7== | ||
| + | Past the checkpoint are some burnable trees and a bear. Before heading on, drop down to the left and dig for 50 baubles. /gg or drop off the cliff to return to the checkpoint. | ||
| + | |||
| + | The Oozes for Ooze Transportation are to the right. | ||
| + | |||
| + | There are two ways to cross the waterfall, a high path and a low path. The high path is safer, but can involve a lot of waiting. | ||
<div style="border:2px solid #292929;"> | <div style="border:2px solid #292929;"> | ||
| − | <div style="padding:0.5rem;text-align:left;background:#1d1d1d;color:#fff;border-bottom:1px solid #111111;border-top:1px solid #292929;">'''Optional: | + | <div style="padding:0.5rem;text-align:left;background:#1d1d1d;color:#fff;border-bottom:1px solid #111111;border-top:1px solid #292929;">'''Optional: 50 baubles'''</div><div style="background:#171717;padding:0.5rem;"> |
| − | + | Jump on the first bouncy mushroom and land on the area above. There is a small cave hidden behind the waterfall between these two levels. If you're lucky (or patient) a log will be drifting by that you can jump on and wait until you pass the entrance. | |
| + | |||
| + | Otherwise, stand towards the back of the leftmost point (as pictures) and jump into the waterfall from here. Performed correctly, you'll land inside the entrance and can dig for 50 baubles. Jump back out to get back to the lower level. | ||
[[file:W1Z3 Shop 6.png|Shop|405px|class=img-fluid]] | [[file:W1Z3 Shop 6.png|Shop|405px|class=img-fluid]] | ||
| Line 118: | Line 222: | ||
| − | + | ===The High Path=== | |
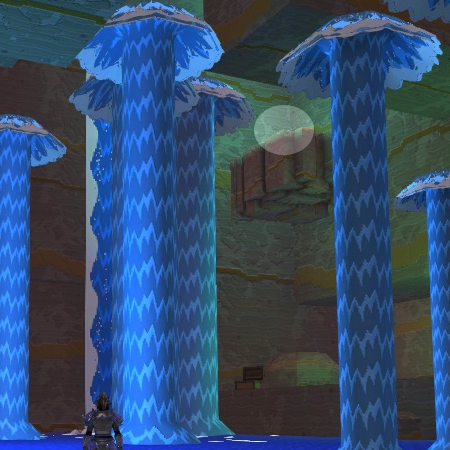
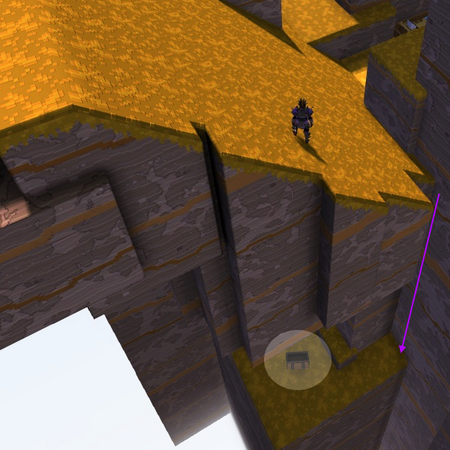
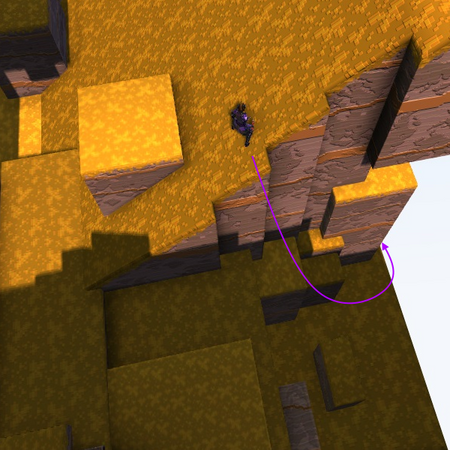
| + | Take the teleporter all the way to the top. If doing ''Ooze Transportation'', you will need to bounce up the series of mushrooms instead. At the top, you need to wait for a slow-moving log to appear, then jump along the series of faster logs to reach a pillar. It can take quite a while for the first log to appear, so be paitent. If you manage it, the next set of logs should be much easier, and you can safely drop down to the checkpoint (or if you're fast, you can actually reach the area with the last chest of the level instead. | ||
| + | Failing to reach the pillar means you'll either need to restart, or drop down (hug the pillar as you fall) and do the low path instead. | ||
| − | |||
| − | |||
| − | + | ===The Low Path=== | |
| + | The low path starts from the platform with the teleporter. There are more logs here, so you won't need to wait as long. You can also reach the next spot with a dodge-jump (though not if doing ''Ooze Transportation''). Land on the rocky part of the central pillar, carefully move around to the other side, then across another log (once more, you can do a dodge-jump instead of waiting for a log). From this next area, wait for a log, hop on, then ride it down. Push into the waterfall as you go, and you'll fall into the dreaded bear cave. | ||
| + | This dark area is full of bears. You want to move quickly to avoid there attacks, and failure can result in you getting stunlocked. A mixture of bouncing mushrooms and climbing will eventually leave you at the top, near the final locked chest of this map. Jump back out of the waterfall to hit the last checkpoint. | ||
| − | |||
| − | |||
| − | |||
| − | + | ==Checkpoint 8== | |
| + | Defeat the boss and finish the level! | ||
Latest revision as of 01:39, 19 May 2024
WIP
Start
Start by following the happy hand up the cliffs to the right and along the wooden bridge. Activate the first checkpoint.
Take the speed boost from the nearby barrel and run all the way along the bridge behind you, be careful as it will collapse behind you.
At the end, jump over the river to the right, then back over and climb up a small way. Finally, jump over the river one more time to reach a small pool. Dig in the middle for 20 baubles.
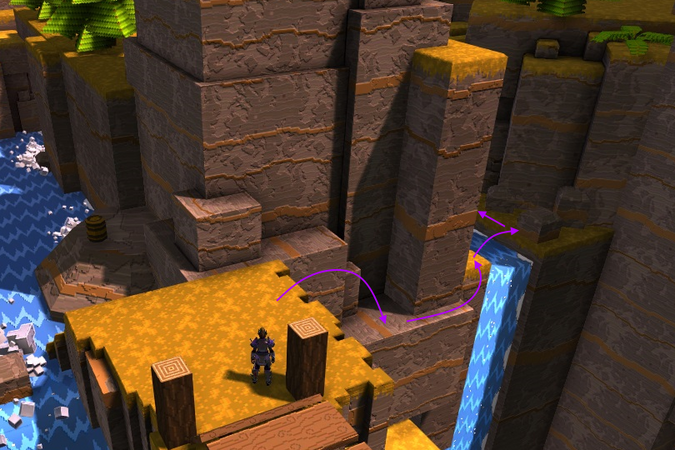
Next, do a large jump back across the river and jump along the rocks part-way down the waterfall. At the penultimate rock, jump into the waterfall to find a small cave with 10 baubles inside.
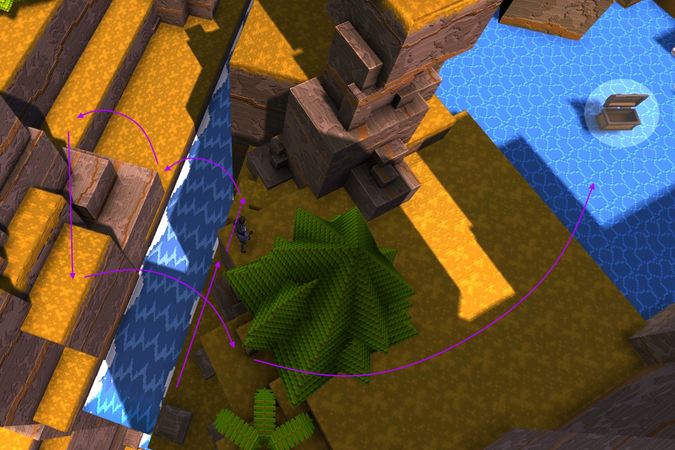
Exit the way you came in and do a big jump to the left, all the way back down to the ground.
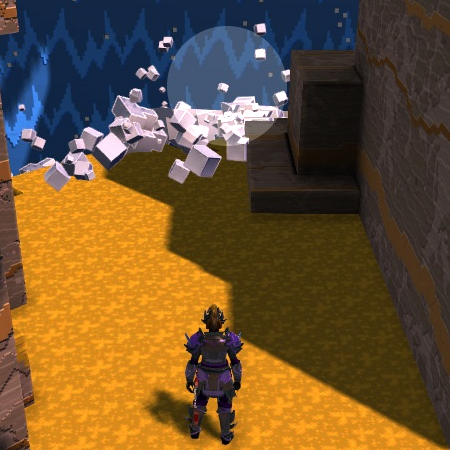
Turn left and walk into the waterfall. Dig at the back of the room for 20 baubles, then jump along the series of water spouts to reach another 20 baubles. /gg to return to the checkpoint.
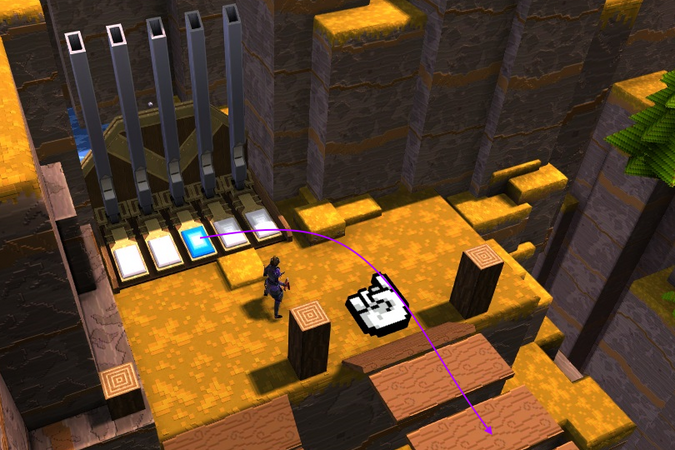
Run along the bridge after activating the checkpoint.
At the end of the bridge, jump to the right and round the corner.
Climb up and jump over the river and dig in the small pool.


At ground level, run into the waterfall here.
Dig at the back of the room.
Location of the bauble at the end of the path of water spouts.


Checkpoint 1
Make your way along the series of crocodiles and turtles and up the cliff to reach the next checkpoint.
Checkpoint 2
Before crossing the long bridge, drop down to the left and dig for an easy 50 baubles. For a safer but slower path, climb down to the right of the checkpoint.
Drop down carefully to the left of the checkpoint.
A slightly longer, but safer path to the right of the checkpoint.
Dig here.


Take the speed boost from the barrel and run across the bridge. If you don't stop, the assassins shouldn't hit you.
Drop down at the end to land on the raft.
Checkpoint 3
You cannot lose progress in this section, so you could afk if you don't care about lives. Otherwise, fight off the assassins until you reach the next checkpoint.
Checkpoint 4
Hop across the rocks to the right then stand on the spinning flower to boost across the river.
The first shop is immediately to your left

Jump to the rock, hit the crocodile, then jump across to the flower. Rather than jump left to the cliff, carefully drop down instead to hit another flower that launches you into the waterfall.

Move fast past the bear and grab the 10 baubles as you go. Climb up the cliffs at the end and burn the tree before dropping down to the left.
Head up the hill, avoiding the bear if possible.

Jump left across the cliffs and the chest is in plain sight.

Just past the chest is a bear. Kill it (finger kills it instantly).
50 baubles are obtainable just past here, but the jump involved is quite unintuitive. Climb up above where the bear is and note the razor-thin ledge. Your goal is to jump off this ledge before you fall. It is too thin to stand on, but with practise you can land on it, move forward a pace, then jump again before you drop, landing on another ledge.
This will likely take some time to learn, but once you can do it reliably, the 50 extra baubles are worth the time.
Make two jumps to an area above the location you entered at, and dig. Jump down and repeat the loop all the way back to the hill.
Facing away, on the right cliff is a toad. This one has a habit of seeing you as you approach, so it may be a good idea to stun it with a boomerang before killing it. Jump across the small gap and burn the nearby tree.
Before moving forward, head left along the cliff, killing the toad immediately round the corner. Continue along this way until you see another toad. Rather than kill it, stand just around the corner and dig for 50 baubles. Return to where you were.
Avoid the flower and head along the cliff to the left.
Follow the path carefully and dig from around the corner.


Bounce along the two flowers, and dig for 20 baubles. Jump down onto the checkpoint.

20 more baubles can be obtained by backtracking down the river. You can jump part way then just let the current drag you along, hitting any creatures along the way and sticking to the left wall. As you reach a dry area just before the waterfall, hop up and dig. Then /gg or jump over the waterfall to return to the checkpoint.

Checkpoint 5
Head forward across the rocks, logs and turtles, to the next checkpoint.
Checkpoint 6
There are a number of diversions for baubles at this point. Two of them take you close to the next area, so they will be listed last.
Head up the hill to your immediate left, then jump across to a small outcrop. The jump is quite long, so a dodge-jump will help, but isn't required. Climb all the way to the top. From this flat area, you want to make another long jump to the topmost rock that is inside the waterfall. Again, a dodge-jump isn't required but is helpful.
Carefully walk through the waterfall, and make three more (easier) jumps along the cliff. Bomb the wall at the end to reveal 5 baubles, then dig to the right of it for 50. /gg or jump off the cliff to return to the waterfall.
Climb up the hill then jump up the cliff.
Long jump onto the small rock then walk through the waterfall.
Two jumps to a platform and bomb the wall.
Dig.


The 20 baubles are just about worth it, but a /gg is required to make it efficient.
Head into the woods, and bear (aha) right, following the wall and trees until you see a toad. Kill it, then dig past the barrel for 20 baubles. Backtrack to the most recent junction, take the right path, and then hug the trees on your left until you reach an opening with a Stump. This is guarded by a Raccoon Kingpin, who is much more dangerous than the Queen Beedogs in world 1, so going here other than for the daily is even less recommended. /gg or backtrack to the checkpoint.

The next two routes provide a lot of baubles, or the glitch. Both these routes take you to the other side of the river (or close enough), so can be used to progress. Otherwise you'll need to make your way across the river normally.
The 20 baubles at the start of the glitch route are good to get regardless of whether you go for the glitch.
Follow the hand to the right to a large river. First, turn right and bomb the waterfall, then walk inside for 20 baubles.
For the glitch, we need to go all the way down the river (look to the left for the water spout just in front of the waterfall). You can jump in without worrying about logs and walk towards the rock next to the spout. From this rock, jump to the spout, then again to dry land.
Make a series of jumps down and to the right, the along the cliff to the left. Climb all the way back up the cliff.
Jump up onto the rock, then the bouncy mushroom and land on the flower, which will launch you across to a new area. Bounce up the mushroom.
Another shop is on the left, and the glitch crystal is to the right. Hit the crystal with a ranged weapon, then jump along the boards that appear. Melee the crystal again as you go past it and carry on, into the waterfall to find the glitch crystal.
If you aren't interested in the final route, you can make a big jump back through the waterfall towards the far end of the river. You won't make it, but you should be close enough to safely wade the remaining distance. If you manage to make it to the area with the burnable trees, you can dig for 50 baubles (see the end of the next optional route for details). Otherwise /gg to return to the checkpoint.
The next route has some tricky sections, but a good number of baubles once you learn it.
Walk forward from the checkpoint towards the hillbillies. Head to the cliff edge to their left and look down. You goal is to drop down and move yourself forward while falling to land in the area below.
From here, jump down towards the river. Follow it upstream, then at the end you will see a small section of "rapids", with small rocks on either side.
Jump up these rocks. If you're careful, you should be able to hold your position even if you get knocked down by the water. Jump into the bouncy mushroom, then the next, and land on the area above, overlooking the checkpoint.
Face the topmost section and dig, then look back down to see a yellow bauble. Jump down, and bomb the crumbly wall next to it. Prepare yourself to move fast when you head inside.
This area is infested with hillbillies. The best thing to do it just run and hope they don't shoot you. Head right immediately, then follow the wall on your left all the way along. Just past a long section with a barrel at the end, you will find an exit, but make sure to pick up the 20 baubles just to the right of it first.
Immediately through, you'll be face to face with a bear. Finger it. Then dig just past it for 50 baubles.
Burn the trees, then downriver and to the right.
However you reach the other side of the river, there is another shop, with a checkpoint to the right. Watch out for the hillbillies and explosive barrels.
Checkpoint 7
Past the checkpoint are some burnable trees and a bear. Before heading on, drop down to the left and dig for 50 baubles. /gg or drop off the cliff to return to the checkpoint.
The Oozes for Ooze Transportation are to the right.
There are two ways to cross the waterfall, a high path and a low path. The high path is safer, but can involve a lot of waiting.
Jump on the first bouncy mushroom and land on the area above. There is a small cave hidden behind the waterfall between these two levels. If you're lucky (or patient) a log will be drifting by that you can jump on and wait until you pass the entrance.
Otherwise, stand towards the back of the leftmost point (as pictures) and jump into the waterfall from here. Performed correctly, you'll land inside the entrance and can dig for 50 baubles. Jump back out to get back to the lower level.
The High Path
Take the teleporter all the way to the top. If doing Ooze Transportation, you will need to bounce up the series of mushrooms instead. At the top, you need to wait for a slow-moving log to appear, then jump along the series of faster logs to reach a pillar. It can take quite a while for the first log to appear, so be paitent. If you manage it, the next set of logs should be much easier, and you can safely drop down to the checkpoint (or if you're fast, you can actually reach the area with the last chest of the level instead.
Failing to reach the pillar means you'll either need to restart, or drop down (hug the pillar as you fall) and do the low path instead.
The Low Path
The low path starts from the platform with the teleporter. There are more logs here, so you won't need to wait as long. You can also reach the next spot with a dodge-jump (though not if doing Ooze Transportation). Land on the rocky part of the central pillar, carefully move around to the other side, then across another log (once more, you can do a dodge-jump instead of waiting for a log). From this next area, wait for a log, hop on, then ride it down. Push into the waterfall as you go, and you'll fall into the dreaded bear cave.
This dark area is full of bears. You want to move quickly to avoid there attacks, and failure can result in you getting stunlocked. A mixture of bouncing mushrooms and climbing will eventually leave you at the top, near the final locked chest of this map. Jump back out of the waterfall to hit the last checkpoint.
Checkpoint 8
Defeat the boss and finish the level!
Comments
Enjoy an ad-free experience & support the website, for less than $1 per month! Upgrade to Premium