How to Unlock the Griffon Mount

Requirements
- Must have finished PoF story, and will need 250 gold. Players short on money should check out our money making guide!
- Many of the events required for these collections are group events. Don't be afraid to ask for help in map chat (and tag up if you can), as there will usually be willing players around.
- You will benefit greatly from having the High Vault mastery on your springer. While not impossible to complete without it, it will nonetheless be much more difficult. Some suggested routes in this guide will also use sand portals.
Starting out
Once players have finished the PoF story, they will start to find strange items dropping from creatures in the Crystal Desert. The descriptions of these items point you towards Beastmaster Ghazel. Double-clicking the item will open the map and highlight the location he may be found.
Talk to Beastmaster Ghazel, and he will direct you to his apprentice, Seeker Kandake, who may be found at Spearmashal’s Lament.
Talk to Seeker Kandake and she will identify that the item comes from a griffon, and suggest that you look nearby. To the east you will discover the Sunspear Sanctuary and the Remains of the Last Spearmarshal. Talking with the remains will unlock the collection
Note that players who have finished the PoF story can go directly to the Sunspear Sanctury and start the collection, without needing to find the strange items or visit the first two NPCs.
You will be given the : An item that allows you to return to the Sunspear Sanctury. It can also teleport you to Sun’s Refuge (if you have it unlocked), and will allow you to trade up to 75 a day in exchange for unidentified gear and minis.
Sunspear Sanctuary
Tasked with restoring the Sunspear Sanctuary, players must travel across the five maps of the Crystal Desert, buying supplies from heart vendors, completing events, and finding griffon eggs.
The supplies cost 25 gold each, and are bought from heart vendors (requiring completion of those hearts). Each map has two such supplies to purchase. After being obtained, the supplies may be consumed for some trade contracts.
The order these collections are completed in is unimportant.
Crystal Oasis
 Event
Event
You must complete the bounty on the Legendary Corrupted Facet (Group event). The bounty itself may be obtained from the bounty board at Destiny’s Gorge.
 Supplies
- Purchase an from Priest Hakim at the Temple of Kormir
- Purchase a from Priestess Karima at Amnoon Farms
 Eggs
Eggs
Collect five eggs from the locations below. All suggested routes start at the Temple of Kormir.
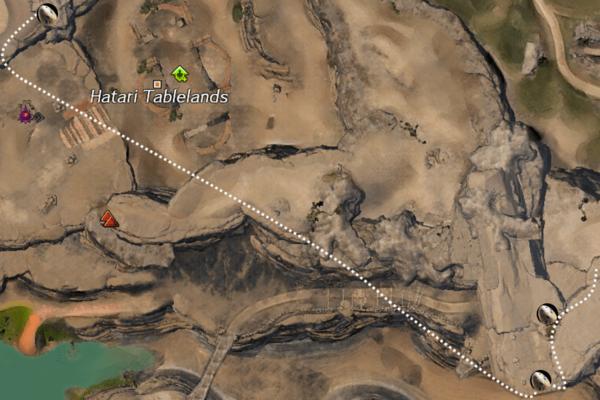
Climb the cliff north of the Temple of Kormir, then continue to the peak to the west to find the first egg. Drop down the cliff to the south and look for another egg partway down. Next, fly north-west past the mastery point and jump up the cliff to find a third egg.
Head north-east from the Temple of Kormir and climb up the inside of the pyramid to the hero point. Make a series of jumps to the outside of the pyramid to reach a ledge on the north face, near the apex.
Find the entrance to the Sanctum of Nabkha south-west of the Temple of Kormir. Follow the sand portals and floating masonry until you reach a point where you can jump up onto a large platform surrounded by columns of different heights. The egg can be found on top of one of these columns.
Desert Highlands
 Event
Event
Defend Second Spear Nayrim (Group event). This is part of an event chain that begins in Makali Outpost.
 Supplies
- Purchase an from Groffmok in Lommuld Kraal
- Purchase from Tendaji at Diviner’s Reach
 Eggs
Eggs
Collect five eggs from the locations below:
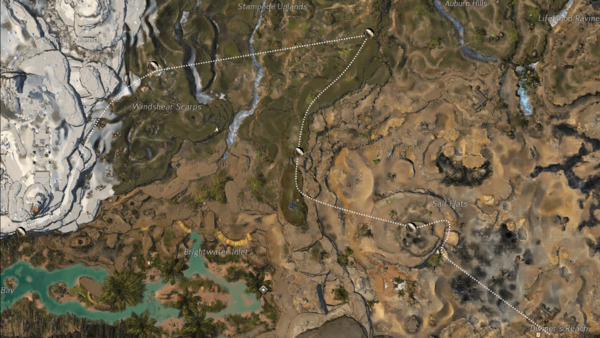
Starting at Makali Outpost, head north-west towards Godfall Tower to find an egg on top of one of the columns. To the west of there is a jackal portal that takes you up the cliff and another egg is found across a bridge to the north. Keep going north along the cliff edge until you reach the highest point, where there is another egg. Fly west towards Giant's Steps to find an egg on top of one of the buildings. Continuing south-west along the snowy cliffs will eventually lead you to the opening to Jinx Hollow. Carefully drop off the cliff to the south to find one last egg on a narrow ledge.
Elon Riverlands
 Events
- Free Emara (Group event). This event follows Helping Erran in Arid Gladefields.
- Defeat the Champion Unbound Djinn (Group event). This event follows gathering memories in Bahdaj Vigil.
 Achievement
Complete the Equipment Tracker achievement, then talk to Master Sergeant Shadi.
 Supplies
- Purchase from Follower Xunn in Skyward Reach
- Purchase from Ebele in Arid Gladefields.
 Eggs
Eggs
Collect three eggs from the locations below:
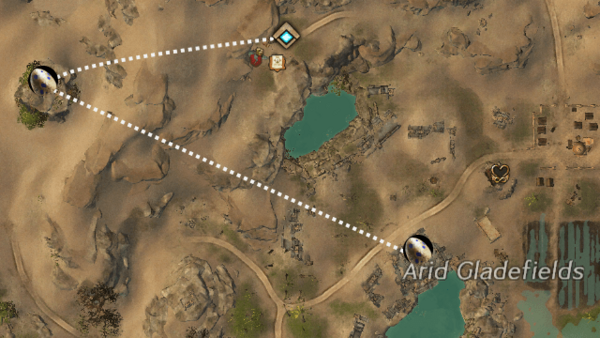
Climb up the rocky pillar to the west of Olishar's Oasis Camp to find an egg, then fly south-east towards to reach another egg just below the vista.
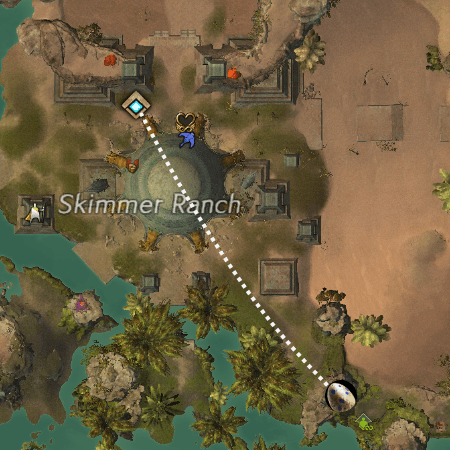
Head south-east of the Skimmer Ranch towards the hero challenge, and climb to the top of the first rocky spire you reach to find a final egg.
The Desolation
 Event
Event
Patrol with Redeemer Kossan near Torment’s Watch. There are three similar events, any of which will award the rune.
 Discovery
Visit Sandstrewn Shrine and search north-west of the point of interest.
 Supplies
- Purchase from Dunkoro in the Lair of the Forgotten
- Purchase from Kisha Odili at The Bonestrand
 Eggs
Eggs
Collect four eggs from the locations below:
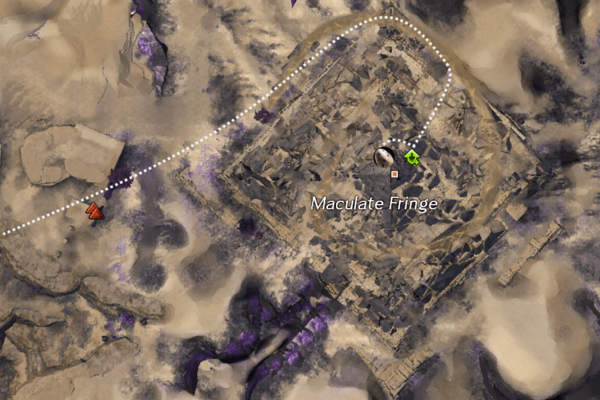
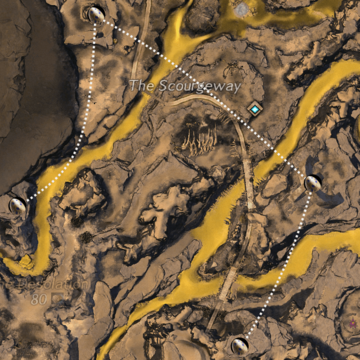
Make your way to the clifftop south of The Scourgeway (head south from the waypoint through the awakened-infested area then east past the Zayan Gate and climb). Collect the egg here, then fly north-east, heading for the top of the large stone chain-link to collect another egg. Next, head north-west past the waypoint to land on a rocky spire for another egg. Finally, follow the cliff wall south and then west to reach the last egg on the edge of a cliff.
Domain of Vabbi
 Event
Event
Rescue First Spear Kitur from The Warehouse.
 Supplies
- Purchase from Awakened Servant Tooraj in Vehjin Mines
- Purchase a from Distinguished Professor Nazimi in Vehtendi Academy
 Eggs
Eggs
Collect five eggs from the following locations:
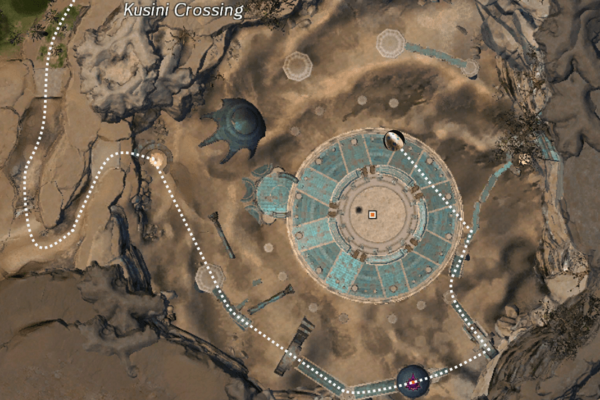
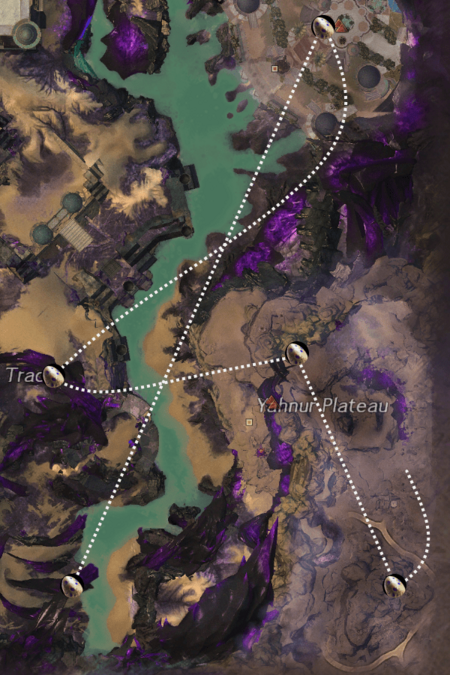
Start from the Sunspear Sanctuary and head south to the tallest of the two nearby spires for your first egg. Fly north-west to land on another tall spire, and jump up to the top for another egg. Next, fly west and land near the top of a branded formation to collect another egg – be wary of the brandstorm! Now fly north-east, aiming for the location where the Brand meets the roof of the Hanging Gardens and find another egg on the other side of a large gap. Finally, fly south-west to land on another branded formation and grab the last egg.
Sunspear Wisdom
After finishing all the above collections, return to the Sunspear Sanctury and interact with the various locations to place the collected eggs and runes. This will grant you the Divine Passage and begin the next collection. At the Tomb of Primeval Kings you can now interact with the seal at the back of the Tomb, where you entered the mists during the main story. Doing so now will transport you to Kormir's abandoned library.
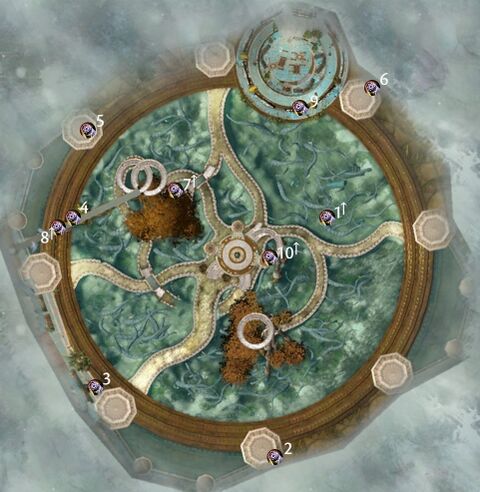
Within the Sanctum are 10 caches, each of which requires a key to open. These keys are obtained by killing elites within the library, each of which has the Key Hoarder effect along with an Unstable Magic Ability. The elites will eventually respawn so you can ignore any elites that prove to be too difficult.
The cache locations are shown below. Caches located in the upper level are indicated by an arrow.
On Wings and a Prayer
Once all writings have been found, return once more to the Sunspear Sanctuary and interact with the pedestals surrounding the statue of Kormir to place the Writings of the Last Spearmarshal. This grants access to the final instance required to unlock the griffon.
A Mordant Crescent Hierarch must be defeated to protect the Sunspear Sanctuary. At 25% health intervals, the Hierarch will become invulnerable and the nearby griffons will begin to glow. Interact with one of these griffons to mount it and use ![]() Swoop to attack the boss, breaking his shield. When the Hierarch dies, you will unlock your very own griffon!
Swoop to attack the boss, breaking his shield. When the Hierarch dies, you will unlock your very own griffon!
Griffon Expert & Master
Once you train the Aerial Prowess and Aerial Finesse masteries for the griffon, you will unlock the Griffon Expert and Griffon Master achievements, respectively. Doing so will also grant you access to the following adventures:
Griffon Expert
- Crystal Oasis
- Desert Highlands
- Elon Riverlands
- The Desolation
- Domain of Vabbi
- Domain of Istan
- Sandswept Isles
- Domain of Kourna
- Jahai Bluffs
- Labyrinthine Cliffs (only during the Festival of the Four Winds – although this is an Expert course, you cannot complete it without Aerial Finesse)
Griffon Master
- Crystal Oasis
- Desert Highlands
- Elon Riverlands
- The Desolation
- Domain of Vabbi
- Domain of Istan
- Domain of Kourna
- Jahai Bluffs
- Labyrinthine Cliffs (only during the Festival of the Four Winds)
Comments
Enjoy an ad-free experience & support the website, for less than $1 per month! Upgrade to Premium
We are looking for experienced build admins and guide writers for Throne and Liberty. Get in touch with Galaxian#1640 on Discord if you're a good fit for the role or know someone else who is. Those are paid position.
